Next event
button ![]() to find the nearest event before or
after the current cursor position, respectively.
to find the nearest event before or
after the current cursor position, respectively.
5.21 Customizing the View
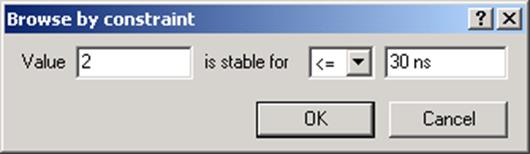
We can browse through waveforms by using constraints.
• Click the Select Browse Object
button located in the bottom-right corner of the Waveform Editor window.![]()
• Select the Browse by constraints
browsing mode in the browse selection box.
• Specify browsing conditions (see the example below) in the Browse by constraint dialog window.
5.22 Customizing the View
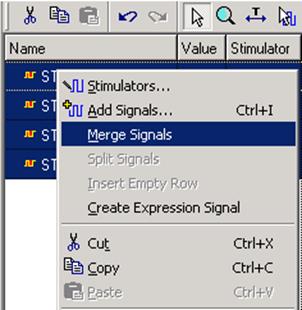
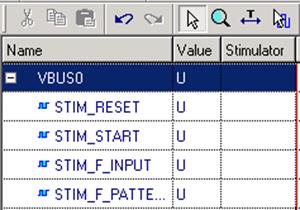
• The waveform editor allows us to group and collapse signals to/from a virtual bus. This can be done by right-clicking the mouse in the Name column of the Waveform Editor and choosing Merge signals / Split signals.
• Aggregated objects (virtual buses) can be also renamed in any of the available working modes (Select, Zoom, Measurement, or Edit).
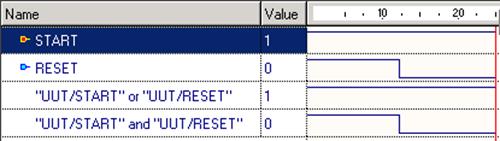
5.23 Expression signals
The Waveform Editor allows you to create logical expressions by using design signals.
To create an expression, right click on the waveform window after choosing a signal or signals. Select Create Expression Signal.
In the dialog box that pops up, write the expression that is a function of the selected signals.
The value of this expression is evaluated and added to the waveform window.

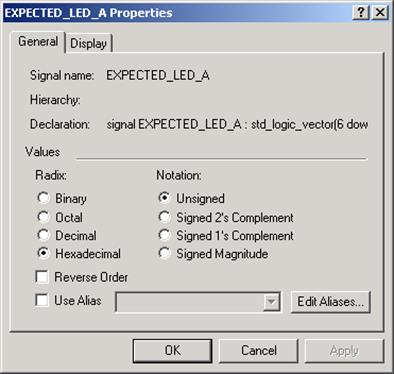
5.24 Signal Properties
This dialog box is used to view properties of the selected signal in the Waveform Viewer/Editor window. To open the dialog, select the desired signal with the right mouse button and then choose Properties from the shortcut menu.
• This dialog box displays the signal name, its hierarchy, and its declaration.
• You can choose the signal to display the values with a Radix of 2 (binary), 8 (octal), 10 (decimal), 16 (hexadecimal).
• Use Alias enables the use of alias selected from the list box.
• Different notations can be used to display the values of signals like Unsigned, Signed 2’s complement, Signed 1’s complement, Signed Magnitude.
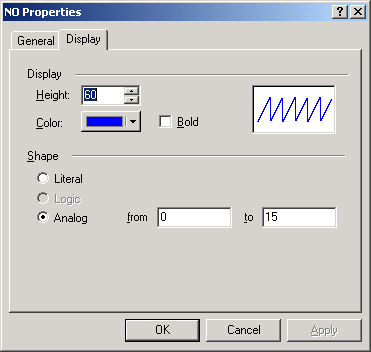
5.25 Signal Properties
Auto-range calculation for the display of analog signals:
• This feature allows the user to automatically calculate the value range of the analog signal displayed in the waveform window.
• The Auto-range feature searches for the minimum and maximum value of the displayed waveform and automatically adjusts its range to present the entire signal.
• If you choose “Analog” and the signal whose properties you are about to change has already been displayed, the auto-range feature will calculate the proper range values and display them in the “from” / ”to” edit boxes.
5.26 Editing Waveforms
The Waveform Editor supports a number of editing features that make it a convenient tool for editing test vectors.
You can edit the waveforms in the Waveform Editor window. Before you start editing you must stop the simulation by choosing the Simulation / End Simulation option.
Editing features are enabled when the editor is working in the Edit mode. The Waveform Editor allows you to create new waveforms and edit existing ones (for example, obtained from an earlier simulation run). Edited by the user, the waveforms can subsequently be applied as custom-type stimulators.
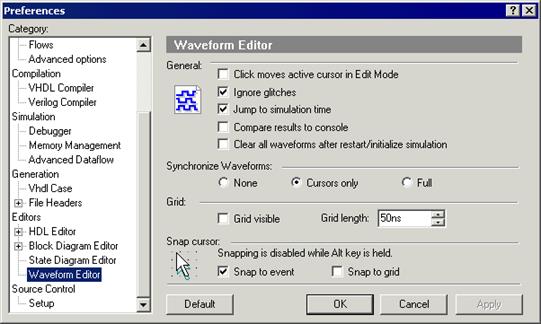
5.27 Waveform Synchronization
This option specifies how the timing cursors will be synchronized in all opened waveform windows:
None - cursors are not synchronized at all.
Cursors only - cursors are set at the same time position in all waveform windows but time ranges (zoom) of these windows remain unchanged.
Full - similar to Cursors only except that the time ranges (zoom) are also synchronized.
5.28 Saving Waveforms
Waveform Editor saves simulation results into waveform files (AWF) that are based on a text format. The editor also allows you to export waveforms into other format files. The following text formats are supported:
• WAVES-compliant test vector files
(*.vec). This format is briefly
referred to as VEC.
Уважаемый посетитель!
Чтобы распечатать файл, скачайте его (в формате Word).
Ссылка на скачивание - внизу страницы.