2) Absence of a gradient of temperatures within the limits of the disk.
3) Absence of a heat transfer, except for radiant, from the disk surface.
Taking into account the accepted conditions of carrying out of measurements, we shall choose the temperature sensor as follows:
1) For maintenance of uniformity of temperature distribution within the limits of the sensor, it is necessary to choose small size and thickness of the sensor, made from material, which possesses good heat conductivity. We shall choose the sensor in the form of a disk in diameter 16mm, thickness 2mm, executed of copper with the emissitivity factor, equal to 0,05.
2) For readout we shall use chromel- thaw thermocouple with wires in diameter of 0,1 mm and length 1,5 m, connected to millivoltmeter (class 0,2) and calked on the part of the disk, opposite to the direction of a heat flow coming its surface.
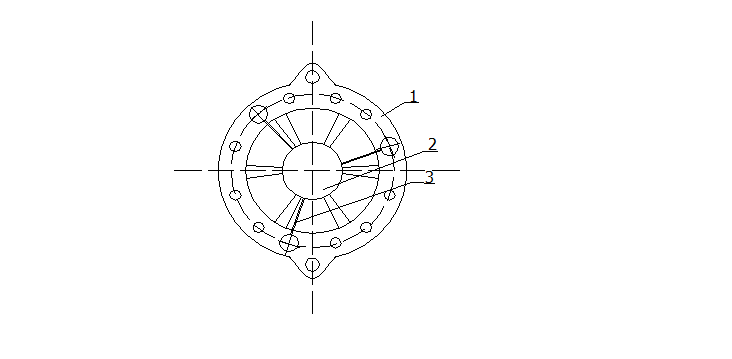
3) For maintenance of absence of a heat transfer from the disk surface it is necessary to reduce heat conductivity from it. For this purpose the disk is fixed on three steel spokes in diameter of 0,2 mm. Because heat conductivity of cores is small in comparison with heat conductivity of the disk, and cores of small diameters are taken, heat conductivity from the surface of the disk will be considerably limited. Also the disk is suspended by specified cores in a ceramic ring which, keeps on three steel racks in diameter 1mm, fixed in a holder. For change of position of the sensor in a radial direction during carrying out of measurements, the tube, by diameter 6 mm and length of 0,5 m is inserted in a holder. The described sensor is shown in figure 12.1.
 Fig. 12.1
1-ceramic ring;
2- sensor;
3-steel spoke.
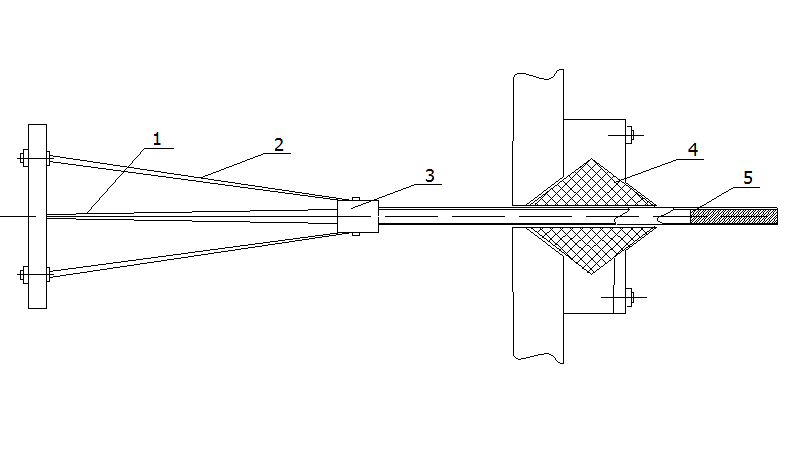
4) Tightness of a tube in which the thermocouple is established, is provided due to compacting, and also by pouring of its internal cavity from the external end by fused picein.
Fig. 12.2
1-wires of the thermocouple;
2-steel core;
3-holder;
4- compacting;
5-internal cavity of the tube filled by fused picein.

12.4 Carrying out of measurements
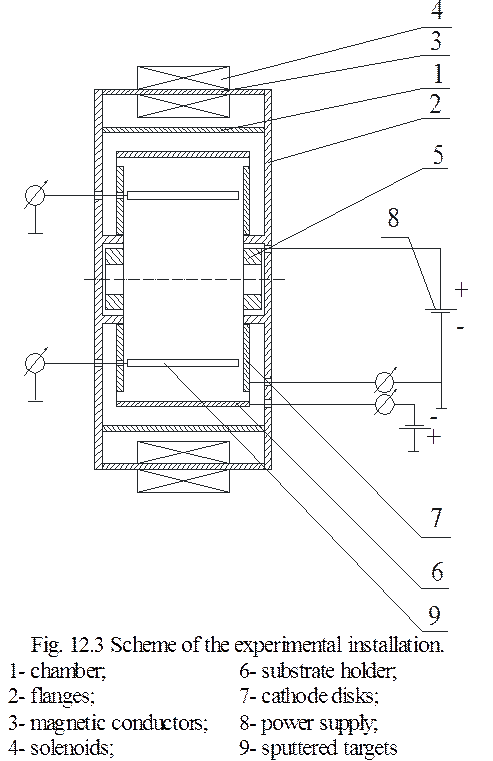
For carrying out of measurements experimental technological installation with a radial stream of plasma has been used. It represents a vacuum compartment, where the basic units of plasma generation are located. The sheme of experimental installation is shown on fig. 12.3.
Measurements have been carried out, when the sensor was located on distance L=55 mm from a cathode - target and on distance L=110 mm from the cathode - target, at working voltage U=500 V and U=700 V. Material of a cathode - target is titan, working gas is argon.
Progress of work:
1) Installation of the sensor on the set distance from cathodes - targets.
2) Measurement of base temperature of the disk.
3) Mounting of the installation.
4) Establishment of the fixed mode for which comparison will be made.
5) Expectation of the temperature balance establishment.
6) Data logging.
7) Recurrence of measurements the set quantity of times.
8) Drawing up the table of the received data.
9) Comparison of the experimental data with the evaluation data.
10) Drawing conclusions.

Table 12.2
|
U L |
500 V |
700 V |
|
55 mm |
661 |
676 |
|
110mm |
549 |
560 |
Table 12.3
Evaluation data
|
U L |
500 V |
700 V |
|
55 mm |
443 |
480 |
|
110mm |
357 |
386 |
Let's compare the data received as a result of experiment with the evaluation data. Results of comparison we shall write down in table 12.4.
Table 12.4
Results of comparison of the experimental data with the evaluation data
Уважаемый посетитель!
Чтобы распечатать файл, скачайте его (в формате Word).
Ссылка на скачивание - внизу страницы.