n If a value is typed into a custom field (rather than picking an item from the drop-down list), the entered data is considered to match a list item as long as it is spelled the same; that is, case does not have to match. After the item is entered, the value is converted to match the exact case of the list entry.
n If the user has specified that new values can be entered and they should be added to the list, but “Prompt before adding new entries” is selected in the Value List dialog, the following alert is displayed when something outside the existing choices is typed in:
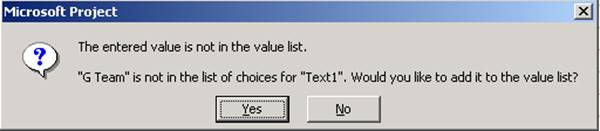
Figure 13 - Value not in Value List
Clicking Yes adds the item to the value list, while clicking No returns the user to the cell in edit mode, with the text highlighted. The user can modify the value they entered, select a different value list item from the drop-down, or cancel out of edit mode.
If the user has specified that the field can only contain the values in the list and no new values are allowed, the following alert is displayed when something outside the existing choices is typed in:

Figure 14 -Value no valid
Clicking OK returns the user to the cell in edit mode, with the text highlighted. The user can modify the value they entered, select a value list item from the drop-down, or cancel out of edit mode.
n A custom field with a value list may display a value not in the list, even though “Restrict field to items in the value list” is selected. This can happen for field types that are never blank because Microsoft Project always specifies a default value (that is, Cost, Date, Duration, Flag, Finish, Number, and Start custom fields). If a new task is created and there is no default value specified in the value list, the Project default will be filled in, regardless of whether it is in the value list. For example, if the value list for Duration1 is restricted to either 1d, 3d, or 5d, but none of these are specified as the default, then the Microsoft Project default of 0d will be inserted for all new tasks, even though it is not contained in the value list.
n If the user has specified a value list for a custom date field, the date picker drop-down will not be displayed when the user clicks in the cell. The user will be limited to the value list choices.
n If there are external tasks in a project, data entered into the custom fields for those tasks must adhere to any local value list restrictions (as opposed to following any custom field settings in the external project).
The Graphical Indicators command button in the Customize Fields dialog brings up the Graphical Indicators dialog shown below, with the selected field name (or renamed alias) as part of the dialog title:
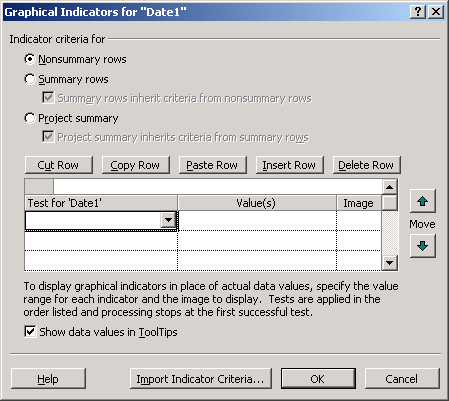
Figure 15 - Graphical Indicators
A description of each of the items in the dialog follows.
Indicate criteria for (group): The Indicator Criteria dialog is used to set different criteria for one or all, of the three different kinds of project tasks, non-summary, summary and project summary. You toggle between the three different grids that contain the three available types of indicator criteria lists.
Non-summary rows: When selected (the default), this option displays the grid with the comparison tests and indicators for non-summary tasks or resources (depending on the current field). The Non-summary rows grid is always enabled (except in some cases with resource pools; see “Custom Field Behavior with Consolidated Projects and Resource Pools,” later in this lesson).
Summary rows: When selected, this option toggles the display to show the grid with the comparison tests and indicators that apply to summary rows, including both summary tasks and group header summaries. The Summary rows grid and the edit and Move buttons are all disabled whenever the “Summary rows inherit criteria from non-summary rows”checkbox is checked:
Уважаемый посетитель!
Чтобы распечатать файл, скачайте его (в формате Word).
Ссылка на скачивание - внизу страницы.