- Install Tooling (B) to clutch housing
(65). Attach Tooling (B) to a suitable lifting sling and a hoist.
- Use Tooling (B) and the hoist in
order to position clutch housing (65). The weight of
clutch housing (65) is 57 kg (125 lb).
|
|
|
View Image
|
|
|
|
Illustration
103
|
g00530718
|
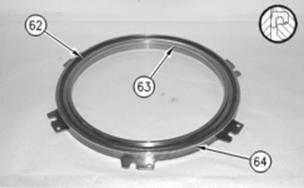
- Install internal seal ring (63) and
external seal ring (64) into clutch piston (62) .
|
|
|
View Image
|
|
|
|
Illustration
104
|
g00530696
|
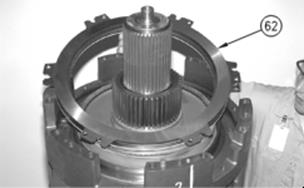
- Install clutch piston (62) onto the
clutch housing.
|
|
|
View Image
|
|
|
|
Illustration
105
|
g00587446
|
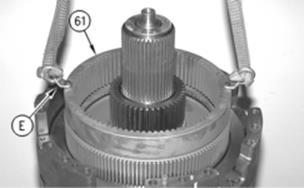
- Install Tooling (E) to ring gear
(61). Attach Tooling (E) to a suitable lifting device and a hoist.
- Use Tooling (E) and the hoist in
order to position ring gear (61) onto the clutch housing. The
weight of ring gear (61) is 34 kg (75 lb).
|
|
|
View Image
|
|
|
|
Illustration
106
|
g00530691
|
|
|
|
View Image
|
|
|
|
Illustration
107
|
g00530689
|
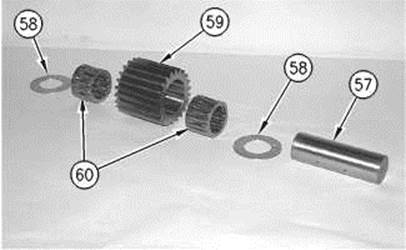
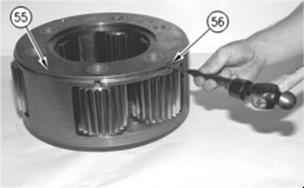
- Install planetary shaft (57), two
thrust discs (58), gear (59), and two bearings (60) to planetary carrier
(55) .
- Use a suitable drift in order to
install spring pin (56) into planetary carrier (55) .
- Repeat Steps 160 and 161 for the
remaining five gears.
|
|
|
View Image
|
|
|
|
Illustration
108
|
g00587457
|
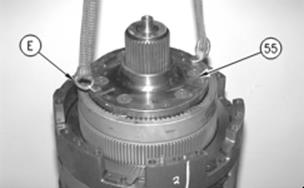
- Install Tooling (E) to planetary
carrier (55). Attach Tooling (E) to a suitable lifting device and a hoist.
- Use Tooling (E) and the hoist in
order to install planetary carrier (55) into the ring gear. The
weight of planetary carrier (55) is 79 kg (175 lb).
|
|
|
View Image
|
|
|
|
Illustration
109
|
g00530685
|
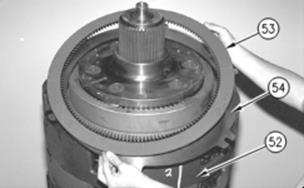
- Install friction disc (53) into
clutch housing (52) .
- Install clutch plate (54) into clutch
housing (52) .
- Repeat Steps 165 through 166 for the
remaining five friction discs and the four clutch plates.
|
|
|
View Image
|
|
|
|
Illustration
110
|
g00530684
|
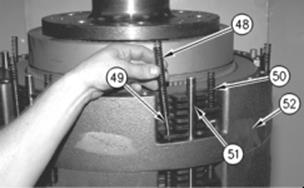
- Install six springs (48), six pins
(49), six springs (50), and six dowels (51) onto clutch housing (52), as
shown.
|
|
|
View Image
|
|
|
|
Illustration
111
|
g00530681
|
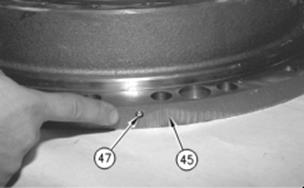
- Install ball (47) into end housing
assembly (45) .
|
|
|
View Image
|
|
|
|
Illustration
112
|
g00587469
|
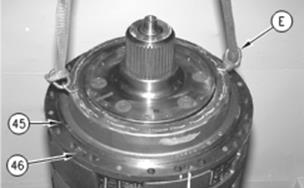
- Install Tooling (E) to end housing
assembly (45). Attach Tooling (E) to a suitable lifting device and a
hoist.
- Use Tooling (E) and the hoist in
order to position end housing assembly (45) onto the clutch housing. The
weight of end housing assembly (45) is 34 kg (75 lb).
|
|
|
View Image
|
|
|
|
Illustration
113
|
g00530677
|
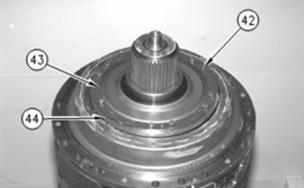
- Install ring (43), oil slinger (44),
and the gasket (not shown) to the planetary carrier.
Note: Install the rubber
side of the gasket against the oil slinger.
- Install 12 locking bolts (42) and the
washers.