If it is required to modify the Circle, quickly double click it with the left mouse key and the relevant Arc editor Form will appear.
An open arc can now be created.
· Select the Arc Menu. ![]()
· Select the Arc through centre, radius and span option. ![]()
· Move the cursor over the open end of the construction line, until End appears and Click with the left mouse button.
This will be the centre point for the radius. The start and end point of the actual arc need to be selected or dragged.
· Move the cursor to the other end of the line and click with the left mouse button.
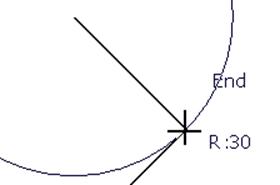
This has set the position for the start of the arc.
· Release all mouse buttons and drag the arc around anti-clockwise.
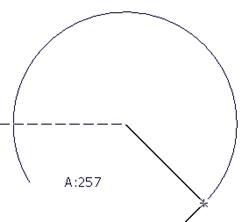
The interactive cursor measures the span of the angle.
When the left mouse button is clicked, the arc is generated.
· Click the left mouse button when the arc reaches about 250 degrees.
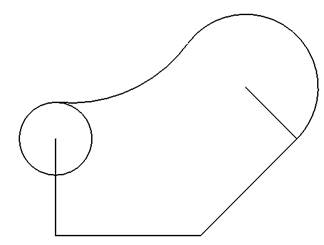
The fillet arcs can now be generated. As the fillet arcs will automatically trim back the initial geometry, no trimming of the geometry is necessary.
The first fillet arc will be between the circle and arc.
· ![]() Select the Arc Menu.
Select the Arc Menu. ![]()
· Select the Three points option.
· Move the cursor over the circle until the word Tangent appears and click left mouse button.
· Move the cursor over the arc until the word Tangent appears and click left mouse button.
· Drag a radius of around 60 and click with left mouse button.
·  Enter the value of 60 and press Accept.
The arc has been trimmed back to the fillet as the arc was already open. The circle cannot be trimmed back until it is opened.
By producing the fillet between the circle and the vertical line, this will enable the circle to automatically trim back between the two fillets.
· ![]() Select the Three points option.
Select the Three points option.
· Move the cursor over the circle until the word Tangent appears and click left mouse button.
· Move the cursor over the vertical line until the word Tangent appears and click left mouse button.
· Drag a radius of around 15 and click with left mouse button.
· Enter the value of 10 and press Accept.
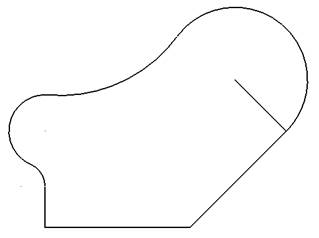
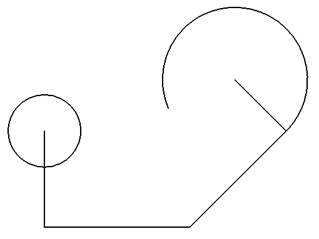
The shape is complete.
An alternative command for this situation would be to create a fillet arc. This is useful if you are creating a lot of fillets using the same radius.
· From the top of the menu bar, select Undo. ![]()
· Select the Arc Menu. ![]()
· Select the Fillet Arc option. ![]()
· Input the value r 10 in the Command input box and press Return.
· Move the cursor over the circle until Fillet 1st Item appears and then Click the Left mouse button.
· Move the cursor over the vertical line until Fillet 2nd Item appears and then Click the Left mouse button.
The same result is produced, but with this command you can continue creating further fillets until the selector is pressed.
![]()
· Press Select.
A composite curve is a single items which is made up of items by linking them together. Once a composite curve has been made this curve can be used for a variety of commands such as surface or solid generation.
The creation of a composite curve can be done automatically or by selecting each item in turn. This allows you to miss items that you do not need.
· Select the Curve Menu. ![]()
· From the down arrow select Composite
curve. ![]()

The composite curve menu appears. This menu has all of the options required for tracing a composite curve.
· With the left mouse button, select the horizontal line.
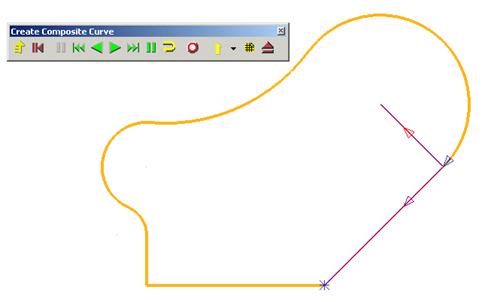
The Composite Curve is generated along the route until it hits a branch point where all alternative directions will be arrowed and change the colour to pink for the user to select the correct route.
· 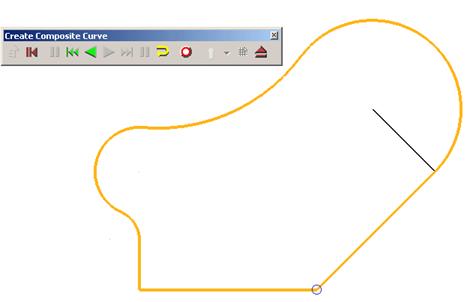 Select the lower angled down line.
The composite curve is now complete. The construction line has been ignored.
The composite curve needs to be saved.
Note: Composite curves can be open as well as closed.
· On the Composite
Curve toolbar, select Save. ![]()
Уважаемый посетитель!
Чтобы распечатать файл, скачайте его (в формате Word).
Ссылка на скачивание - внизу страницы.