3. Mounting datum and initial datum should coincide in the most of machining operations.
4. The best accuracy of relative position of work surfaces is obtained, if they are machined in one operation.
Best of all use the constancy datum principle.
Purpose of stage of manufacturing process:
Roughing stage: removal of surface defects and equalization of allowance for further machining. Cutting conditions are severe.
Finishing stage: providing of specified shape of surfaces, further increase of accuracy of surfaces, of their relative positions, of surface roughness.
Fine finishing stage: all the requirements for accuracy of surfaces and their relative positions, surface finish are performed.
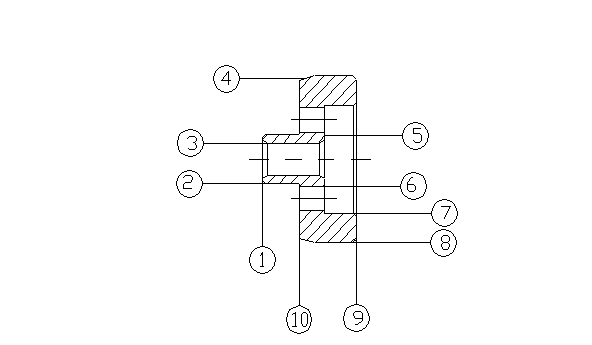
After analysis of dimensions positions make a drawing with specified manufacturing datum. In our case we have 10 surfaces.[fig 2.1].
The number of manufacturing steps depends on tolerances of a surface of a blank and its roughness and tolerances and roughness of part’s surface.
The sketch of a part with the indicated machining surfaces is shown on fig. 2.1:

Figure 2.1 The sketch of a work piece
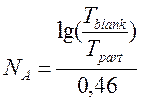
To develop the surface plan machining we should calculate the number of manufacturing steps to produce the required roughness and accuracy. According to the drawing, where the full information of the part is given, we can begin calculations. We should know the parameters of accuracy and roughness for the part and blank. To calculate the number of manufacturing steps we should use the following formulas


For the face
surfaces we have only ![]() , but for the diameter ones we
have
, but for the diameter ones we
have ![]() and
and ![]() , they
are compared after calculations and than we choose the larger value. We choose
the value according to this rule:
, they
are compared after calculations and than we choose the larger value. We choose
the value according to this rule:
2.49 2
2.51 3
For example let us calculate the number of manufacturing steps for surface number 8.
Diameter of the part is 30.8 mm, diameter of the blank is 35 mm.
Roughness of the blank is RZ 160, tolerance 1100;
Roughness of the part is RZ 20, tolerance 62;
Calculating na and nR


So ![]() due
to the rule is equal to 3.
due
to the rule is equal to 3.
Having known the number of manufacturing steps we should to distribute the accuracy class, tolerance and roughness in such way that it satisfied three parameters simultaneously. Therefore, we use the rule of progressive decrease and for this example we have to make a distribution in 3 steps ready.
Thus, the distribution for
![]() was done in the following way:
was done in the following way:
ü 160 : 80 – 40 - 20
For the accuracy class we have following:
ü 16 : 12 – 10 – 9
For the tolerance we have following:
ü 1100 : 250 – 100 - 62
The calculations of the necessary manufacturing steps were done for other surfaces in the same way. Thus, having obtained the preliminary number of manufacturing steps, we should make a distribution for roughness, tolerance and accuracy class. Depending on this distribution we can find recommendations for the machining methods. . Similar steps are done for other surfaces of the part.
The calculations results were plotted in the table # 2.1
For allowances for machining and operational dimensions determination, will use normative method.
Calculated diameters (operation dimensions) are specified in such a manner, that they coincide with nominal and maximal diameters (tolerance is “in the metal”). We’ll use the following formulas:
Уважаемый посетитель!
Чтобы распечатать файл, скачайте его (в формате Word).
Ссылка на скачивание - внизу страницы.