|
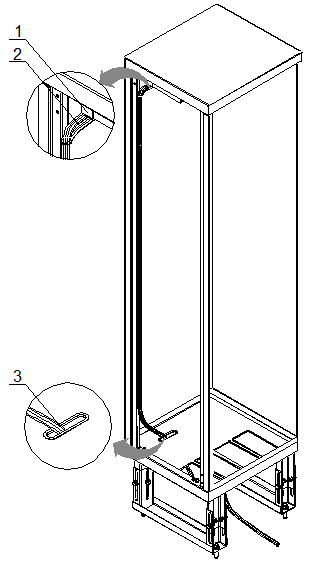
1. DC power distribution box |
2. Power cable and PGND cable |
3. Cabling hole on the cabinet |
Figure 7-7 Wire the power cable and the grounding cable in downward cabling mode
7.1.3 Installation Check
n The connectors of the power cable and PGND cable are fixed firmly and connected reliably.
n The contents on the cable label are consistent with those in design.
n The PGND cable and power cable between the cabinet and the power supply equipment have no roundabout twists or turns.
7.2 Installing STM-1 Cables
|
Overview |
This section tells you the procedures and precautions for installing and routing the STM-1 cable. |
|
Prerequisites |
n Check the construction condition Digital distribution frame (DDF) in the equipment room has been installed, with interfaces reserved for use in this installation. n Check the cabling route Work out the length of the required STM-1 cable according to the cabling route, as specified in the construction documents, between the cabinet and the DDF in the equipment room. |
|
Installation materials |
n STM-1 cable with an SMB connector, as shown in Figure 7-8 n Labels for STM-1 cable n Cable tie |
|
Positions for cable interfaces |
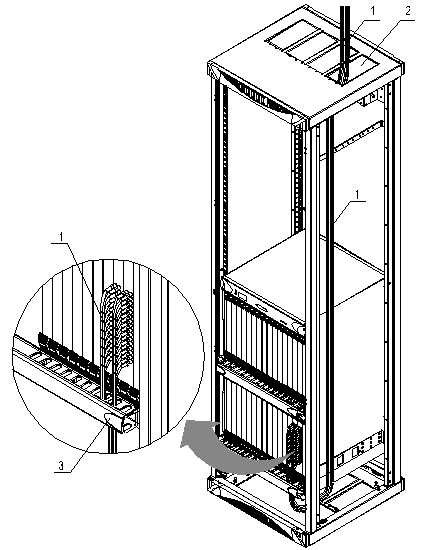
Figure 7-9 shows the electrical interfaces, as outlets for STM-1 cables, on the JLHE board of the OptiX OSN 9500. |
|
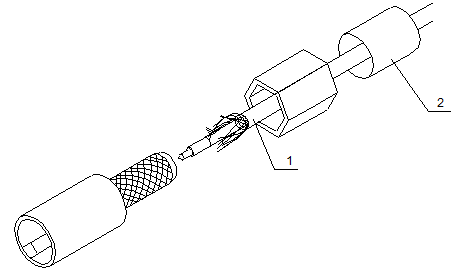
1. Coaxial cable |
2. Heatshrink tube |
Figure 7-8 SMB coaxial connector

Figure 7-9 Outer view of JLHE
![]() Caution:
Caution:
For ease of routing other cables and fiber jumpers, JLHE must be inserted in any slot of IU17–IU32 in the front of the subrack. If it is inserted in any other slot, correct it. In doing so, refer to section 6.1.1 “Inserting a Board” and section 6.1.2 “Unplugging a Board” in Chapter 6.
7.2.1 Procedures in Upward Cabling Mode
& Note:
This section describes the right cabling for example. It is the same as the left cabling.
|
Step |
Operation |
|
1 |
Before installing the cable, attach temporary marks to its both ends for distinguishing. |
|
2 |
Route the STM-1 cable to pass through the cabling hole for signal cables on the top of the cabinet, and route it downward along the side panel of the cabinet to the bottom of the subrack. |
|
3 |
Route the STM-1 cable to pass upward through the cabling trough of the subrack below JLHE and then connect it to the SMB interface on JLHE. |
|
4 |
Bind the STM-1 cables properly, as shown in Figure 7-10. |
|
5 |
Remove the temporary marks on the cable. Attach the cable labels 2 cm away from the connectors at the two ends, as shown in Figure 7-11. The rectangular text area of the label should be oriented to right or underside. |
|
1. STM-1 cable |
2. Cabling hole for signal cables |
3. Cabling trough |
Figure 7-10 Wire the STM-1 cable in upward cabling mode
|
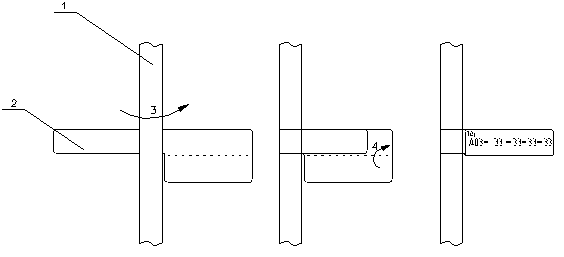
1. STM-1 cable |
2. Label |
3. Fold to right |
4. Fold upward |
Figure 7-11 Affix a label
7.2.2 Procedures in Downward Cabling Mode
|
Step |
Operation |
|
1 |
Before installing the cable, attach temporary marks to its both ends for distinguishing. |
|
2 |
Route the STM-1 cable to pass through the cabling hole for signal cables at the bottom of the cabinet, and route it upward to the subrack cabling trough below JLHE. |
|
3 |
Connect the connector of the STM-1 cable to the SMB interface on JLHE. |
|
4 |
Bind the STM-1 cables properly, as shown in Figure 7-12. |
|
5 |
Remove the temporary marks on the cable. Attach the cable labels 2 cm away from the connectors at the two ends, as shown in Figure 7-11. The rectangular text area of the label should be oriented to right or underside. |
Уважаемый посетитель!
Чтобы распечатать файл, скачайте его (в формате Word).
Ссылка на скачивание - внизу страницы.