|
Input terminal block ID |
Name of the input cable |
Color of the input cable |
Connector of the input cable |
|
RTN1(+) |
Power cable |
Blue |
Cord end terminal, as shown in Figure 7-2. |
|
RTN2(+) |
Power cable |
Blue |
Cord end terminal, as shown in Figure 7-2. |
|
NEG1(-) |
Power cable |
Black |
Cord end terminal, as shown in Figure 7-2. |
|
NEG2(-) |
Power cable |
Black |
Cord end terminal, as shown in Figure 7-2. |
|
|
PGND cable |
Yellow/green |
JG two-hole bare pressure welding terminal, as shown in Figure 7-2. |
|
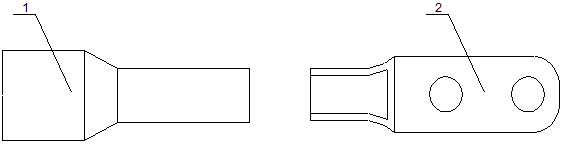
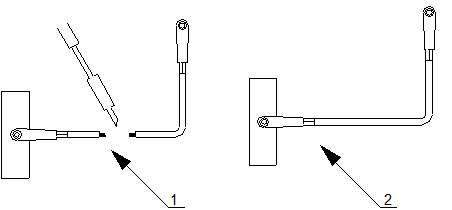
1. Cord end terminal |
2. JG two-hole bare pressure welding terminal |
Figure 7-2 Outer view of power connectors
|
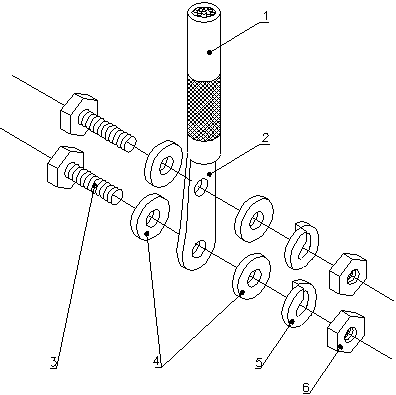
1. Grounding cable |
2. Two-hole lug |
3. Grounding bolt |
|
4. Flat washer |
5. Spring washer |
6. Nut |
Figure 7-3 Connect the grounding lug
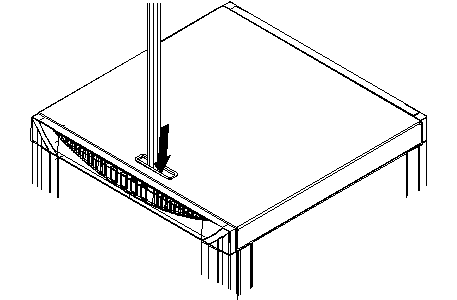
Figure 7-4 Wire the power cable and the grounding cable in upward cabling mode
|
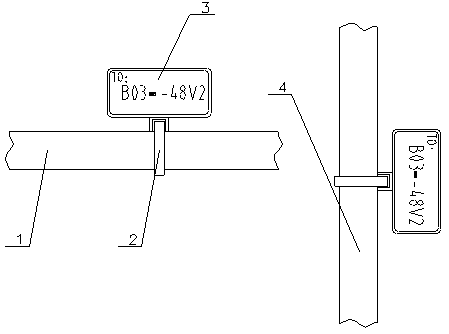
1. Power cable (placed horizontally) |
2. Cable tie |
|
3. Identification plate |
4. Power cable (placed vertically) |
Figure 7-5 Bind the power cable label
|
1. Soldering |
2. Entire cable |
Figure 7-6 Extend the power cable and the grounding cable
7.1.2 Procedures in Downward Cabling Mode
|
Step |
Operation |
|
1 |
Before installing the cable, attach temporary marks to its both ends for distinguishing. |
|
2 |
Cut off the redundant cable according to the distance between the cabinet and the power supply equipment in the equipment room. Then install appropriate connectors at both ends of the cable. When installing the connector, connect it firmly with the cable and equip it with a heat-shrink tube so as not to expose the bare core and the handle of the connector. |
|
3 |
Route the power cable and the PGND cable, through the power cable outlet at the bottom of the cabinet, to the cabling trough on the front post of the cabinet. Then wire them upwards to the DC power distribution box on the top of the cabinet, as shown in Figure 7-7. |
|
4 |
According to the connection relations as shown in Table 7-2, insert the end of power cables into RTN 1(+), RTN 2(+), NEG 1(-), and NEG 2(-) in turn. Screw them tight with a screwdriver. |
|
5 |
According to the pin assignment as shown in Table 7-2, connect the two-hole lug of the PGND cable to the grounding bolt, as shown in Figure 7-3. Fasten the nuts with a socket wrench with a proper force as to flatten the spring washer. |
|
6 |
Measure the resistance between the power
supply [RTN 1(+)/RTN 2(+)] and PGND( |
|
7 |
Turn on the power switch of the power supply equipment, and then measure the voltage between the power supply RTN 1(+)/RTN 2(+) and the power ground NEG 1(-)/NEG 2(-). The voltage should be –48 V±20% (or –60 V±20%, if the rated input voltage is 60 V). Make sure that the anode and the cathode are connected correctly. Finally close the power switch of the power supply equipment. |
|
If the power supply equipment outputs a voltage beyond the range, a suggestion for improvement should be given and the OptiX OSN 9500 should not be powered on. |
|
|
8 |
Remove the temporary marks and bind the cable ties of the identification plates 2 cm away from the connectors of the cable, as shown in Figure 7-5. |
Уважаемый посетитель!
Чтобы распечатать файл, скачайте его (в формате Word).
Ссылка на скачивание - внизу страницы.