Note: If the Pgm Code (FLASH) option is not selected, this option is not available
(because a chip erase is not performed during the program cycle.)
Flash (Program) Area
The Flash (Program) Area section has two main parts – the buffer information boxes and the command buttons (see Figure 4). The buffer information boxes tell what file (if any) has been selected for the buffer and whether or not that file has been loaded into the buffer. The command buttons control the file selection, loading the buffer from the file, editing the buffer, and saving the buffer to a file.

- Browse - The Browse command button prompts the user to select a file to load to the buffer. Once a file is selected, the filename is displayed in the edit field to the left of the Browse button.
- Load - The Load command button prompts load the selected file into the buffer. The progress bar below the filename edit field shows how much of the available memory is used by the buffer.
- Edit - The Edit command button opens the Buffer Editor to allow the user to edit the contents of the buffer.
- Save - The Save command button prompts the user for a filename to save the current buffer contents under.
EEPROM Area
The EEPROM Area section has two main parts – the buffer information boxes and the command buttons (see Figure 5). The buffer information boxes tell what file (if any) has been selected for the buffer and whether or not that file has been loaded into the buffer. The command buttons control the file selection, loading the buffer from the file, editing the buffer, and saving the buffer to a file.
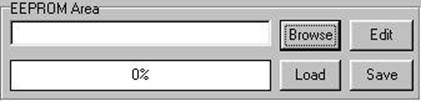
Figure 5 - EEPROM Area
- Browse - The Browse command button prompts the user to select a file to load to the buffer. Once a file is selected, the filename is displayed in the edit field to the left of the Browse button.
- Load - The Load command button prompts load the selected file into the buffer. The progress bar below the filename edit field shows how much of the available memory is used by the buffer.
- Edit - The Edit command button opens the Buffer Editor to allow the user to edit the contents of the buffer.
- Save - The Save command button prompts the user for a filename to save the current buffer contents under.
Statistics
The Statistics section displays information about the processor selected, the flash and EEPROM buffers, and the progress of the operation being performed. See Figure 6.
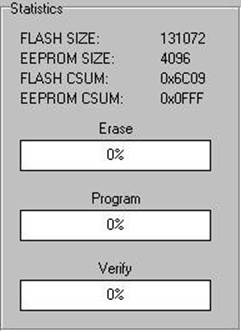
FLASH SIZE: Size of the flash area of the processor selected.
EEPROM SIZE: Size of the EEPROM area of the processor selected.
FLASH CSUM: Checksum of the flash buffer contents.
EEPROM CSUM: Checksum of the EEPROM buffer contents.
The progress bars represent the percent completion of the operation being performed. The operation being performed is indicated by a caption above the progress bar.
Command Buttons
There are six command buttons available from the main window: Read, Program, Verify, Erase, Blank Check, and Exit.
- Read – Read the selected areas (flash and/or EEPROM) into the appropriate buffer and update the check sum field for all read buffers. Update the buffer filename to Flash_Buff or EEPROM_Buff to indicate that the contents of the buffer are from the processor and not a loaded file.
- Program – Program the processor according the options selected.
- Verify – Read and verify the processor for the areas selected (flash and/or EEPROM.) If discrepancies are detected, the user is informed that differences exist and those differences are listed.
- Erase – Perform a Chip Erase operation on the processor.
Уважаемый посетитель!
Чтобы распечатать файл, скачайте его (в формате Word).
Ссылка на скачивание - внизу страницы.