|
Overview |
This section introduces the steps and precautions for installing the support. |
|
Prerequisites |
The position and mounting holes for the support have been determined. |
|
Mounting materials |
n S600A support n M 12 x 60 bolt set n M 12 x 30 bolt set n Expansion bolt
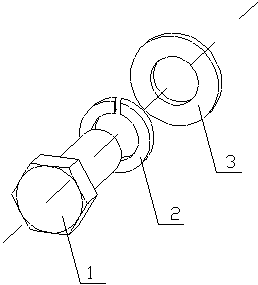
The flat washer and spring washer must be used when installing the bolt, as shown in Figure 3-4. |
|
Reference |
The S600A support is adopted for the OptiX OSN 9500, as shown in Figure 3-5. There are four specifications of supports: three of adjustable heights and one of fixed height. Table 3-2 shows the range of height for each specification. & Note: The height of ESD floor refers to the distance from the upper plane of the floor to the surface of the cement floor. |
|
1. Bolt |
2. Spring washer |
3. Flat washer |
Figure 3-4 Bolt assembly
|
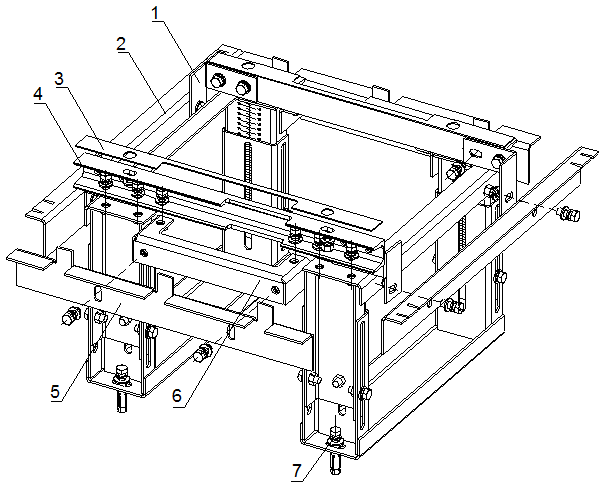
1. Fixing bracket for side pallet |
2. Side pallet |
3. Insulation plate |
|
4. Slide rail |
5. Horizontal pallet |
6. Fixing bracket for horizontal pallet |
|
7. Expansion bolt |
Figure 3-5 Outer view of the support and its accessories
Table 3-2 Support specifications
|
Specification |
Height of floor available (mm) |
|
I |
210–255 |
|
II |
256–345 |
|
III |
346–525 |
|
IV |
Customized to the height of floor (not less than 100 mm) |
& Note:
The height of ESD floor refers to the distance from the upper plane of the floor to the surface of the cement floor.
3.3.1 Procedure
|
Step |
Operation |
|
1 |
Use a percussion drill equipped with a Ф16 drill bit to make four support mounting holes of 52 mm–60 mm deep on the ground. In doing so, the drill bit should be vertical to the ground and depth of the four holes should be the same. |
|
Take appropriate measures to prevent the dust from dispersing. A vacuum cleaner is recommended for that purpose. |
|
|
2 |
As shown in Figure 3-6, put an expansion tube and an expansion nut into a mounting hole vertically. Directly hammer at the expansion tube with a rubber hammer to drive it into the floor. Repeat the above operations to install the other three expansion tubes and expansion nuts. |
|
The guide rib on the expansion nut must be inserted into the guide slot on the expansion tube beforehand. Otherwise, the expansion bolt cannot be installed firmly. |
|
|
3 |
Adjust the height of the support according to the height indicator to make the support as high as the ESD floor. Use a force of up to 45N·m to tighten the height-locking bolt. See Figure 3-7 for positions of the height-locking bolts. |
|
In tightening the height-locking bolts, follow the principle of "middle first, sides later". That is, screw tight the middle height-locking bolt first, then the side ones. |
|
|
4 |
Assemble the support to slide rails with bolts M12 x 30. Four bolts of the same type are needed to fix each slide rail, as shown in Figure 3-8. |
|
Before tightening the bolts, correct the support position in such a way as to make the two diagonal lines (straight lines A and B as shown in Figure 3-8) of slide rails equally long. |
|
|
5 |
Vertically insert bolts M12 x 60, through the mounting holes for the support, into the expansion bolts’ holes on the floor. Use a force of up to 45 N·m to tighten them. Each support needs to be fixed with four bolts of the same type, as shown in Figure 3-9. |
|
6 |
Fix the fixing brackets for horizontal pallet and side pallet respectively to the slide rail, as shown in Figure 3-10. Each side should be fixed with one fixing bracket for horizontal pallet while two fixing brackets for side pallet. |
|
& Note: The pallet serves to support the ESD floor surrounding the cabinet, while the fixing bracket for pallet to fix the pallet. |
Уважаемый посетитель!
Чтобы распечатать файл, скачайте его (в формате Word).
Ссылка на скачивание - внизу страницы.