To support the extended subrack, you need to upgrade the cross-connect board from GXCS to UXCSB. For details, refer to section 6.1.5 “Cross-Connect Capacity Expansion and Upgrade”.
The extended subrack is an OptiX OSN 3500 subrack, configured with the cross-connect board XCE (1+1 hot backup) and two PQ1 boards and four D75S interface boards. Figure 6-9 shows the configuration of the extended subrack.
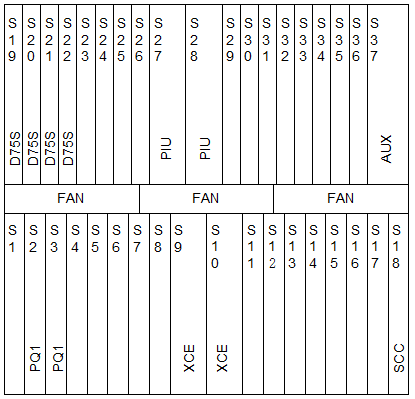
Figure 6-9 Typical configuration of the extended subrack in NE1
![]() Caution:
Caution:
If the cabinet in NE1 has no enough space to hold the extended subrack, add a new cabinet.
The extended subrack supports at most 1.25 Gbit/s cross-connect and grooming capability.
The extended subrack supports TPS for E1 services.
|
Step |
Action |
|
1 |
Upgrade the cross-connect board in the main subrack to UXCSB. For details, refer to section 6.1.5 “Cross-Connect Capacity Expansion and Upgrade”. |
|
2 |
Install the extended subrack in the cabinet and connect the power supply unit at the top of the cabinet to the PIU board of the extended subrack. |
|
3 |
Connect the main subrack with the extended one through a cable and route the cable. |
|
4 |
Insert two PQ1 boards and four D75S interface boards in the extended subrack. |
|
5 |
Configure services for the new tributary boards through NM. |
When the existing equipment in a single station fails to meet the increasing requirement, new NEs should be added to offer more capacity for service incremental.
This kind of expansion is similar to the operation of creating NEs, but the expansion may use the existing cabinet or extended subrack, or connect the new NE to existing cables and fibers. For the expansion method, refer to the operation of creating an NE.
Adding an NE on the ring network differs with the networking protection mode. Here takes the MSP ring as an example. The operation under SNCP is similar to that under MSP, except that the former one needs no enable/disable of protocol and modification of protection group attribute.
The OptiX OSN 3500 can add an NE without interrupting services. In Figure 6-10, add a node in a two-fiber bidirectional MSP ring that comprises four nodes. Add NE6 between NE3 and NE4.
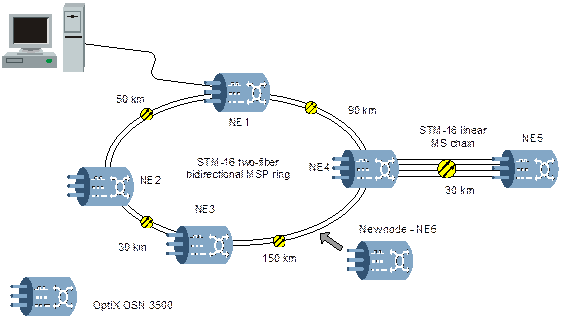
Figure 6-10 Add a node to a two-fiber bidirectional MSP ring
![]() Caution:
Caution:
The optical power should be adjusted with the change of transmission distance to ensure the transmitting/receiving optical power is within normal range.
In upgrade, the multiplex section parameter and protection attribute of each NE should be re-configured or adjusted.
|
Step |
Action |
|
1 |
Install hardware in new NE, and then perform a commissioning to ensure it works normally. |
|
2 |
Make services between NE3 and NE4 pass through the new NE. |
|
3 |
Execute forced MSP switching on NM or remove the fiber between NE3 and NE4. Then, the ring is in MSP switching status. |
|
4 |
Join NE6 in the ring and connect the fiber, as shown in Figure 6-11. The optical attenuator can be added during fiber connection to adjust the receiving optical power that changes with the transmission distance. |
|
5 |
On NM, disable the MSP protocol and modify the attribute of protection group of the multiplex section/ring in NE3, NE4 and NE6. For the configuration requirement of protection group of a multiplex section/ring, refer to section A.4.2 “Configuration Requirement of MSP Ring”. |
|
6 |
Enable the MSP protocol to complete the NE in-service adding. |
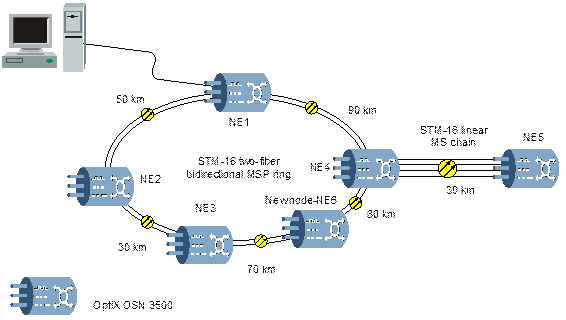
Figure 6-11 The two-fiber bidirectional MSP ring with NE6 added
Уважаемый посетитель!
Чтобы распечатать файл, скачайте его (в формате Word).
Ссылка на скачивание - внизу страницы.