|
Step |
Operation |
|
1 |
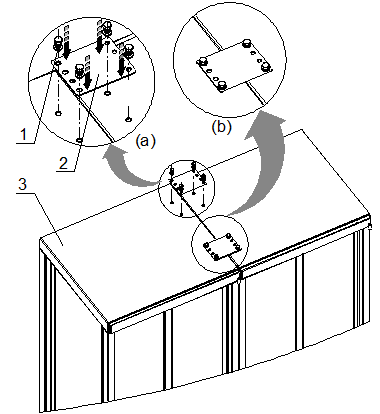
Cover two M8 x 20 bolts with spring washers and big flat washers. Insert them, through the joint plate, into screw holes on the top of two adjacent cabinets. Screw them tight to fix the joint plate, as shown in Figure 5-2 (a). |
|
2 |
Fix the other joint plate in the same way as that in Step 1. Figure 5-2 (b) shows the expected result. |
![]() Caution:
Caution:
Two joint plates are needed to combine any two adjacent cabinets.
|
1. Bolt M8 x 20 |
2. Joint plate |
3. Cabinet |
Figure 5-2 Combining cabinets
5.1.2 Installation Check
Figure 5-3 shows how the combined cabinets look. For any technical issues, contact the local office of Huawei promptly.
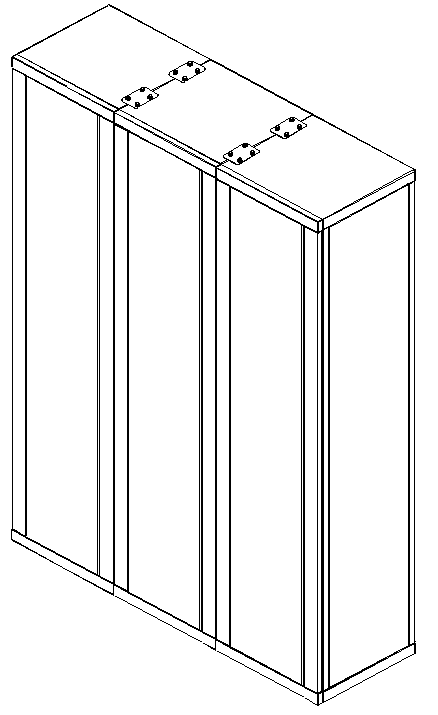
Figure 5-3 Expected result of combined cabinets
5.2 Fixing Cabinets on an Overhead Cabling Frame
|
Overview |
This section tells you the procedure and precautions for fixing ETSI 600mm-deep cabinets through an overhead cabling frame in the equipment room. |
|
Prerequisites |
n The overhead cabling frame has been installed in the equipment room. n The ETSI cabinets of 600 mm deep have been installed. n Complete materials for fixing purpose have been prepared. |
|
Procedure |
Select an installation mode according to the distance (H) between the cabling frame and cabinet, and whether there are troughs at both sides of the cabling frame, as shown in Figure 5-4. |
|
Materials |
n Fixing bracket n Height-adjustment bracket n Insulation plate n Diamond-shaped nut n M8 x 20 bolt set n M8 x 25 bolt set n M8 x 50 bolt set n Clamp
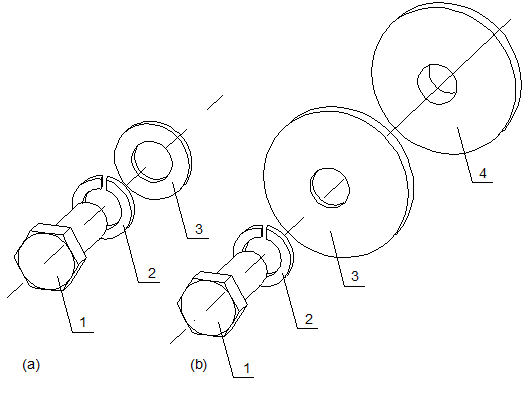
The flat washer and spring washer must be used when assembling a bolt, as shown in Figure 5-5 (a). To ensure the cabinet insulation, bolt M8 x 25 for connecting the fixing parts and the cabinet must be covered with an insulation washer, as shown in Figure 5-5 (b). |

Figure 5-4 Flow chart of installing cabinet fixing parts
|
1. Bolt |
2. Spring washer |
3. Flat washer |
4. Insulation washer |
Figure 5-5 Bolt assembly
5.2.1 Fixing Cabinet on a Cabling Frame with a Side Trough (H £ 200 mm)
|
Step |
Operation |
|
1 |
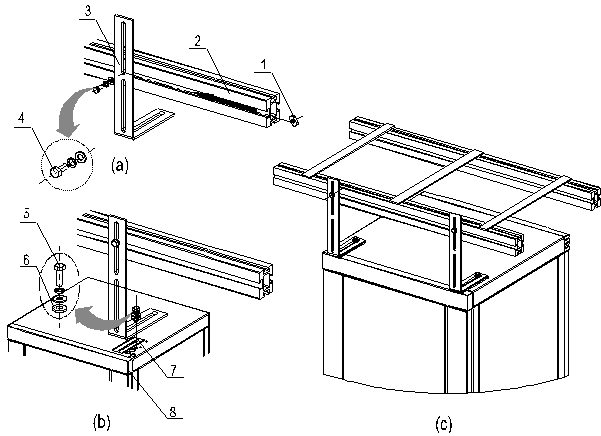
Determine where to install the fixing parts according to positions of the installed cabinet and the cabling frame. |
|
2 |
Place the diamond-shaped nut into the trough of the cabling frame. |
|
3 |
Cover the bolt M8 x 20 with a spring washer and a flat washer. Screw it, through the fixing bracket, into the diamond-shaped nut in the trough with such a proper strength as to prevent the bolt from falling out, as shown in Figure 5-6 (a). |
|
4 |
Place an insulation plate between the cabinet and the fixing bracket. |
|
5 |
Cover the bolt M8 x 25 with a spring washer, a big flat washer and an insulation washer. Screw it, through the fixing bracket and the insulation plate, into the nut on the cabinet with such a proper strength as to prevent the bolt from falling out, as shown in Figure 5-6 (b). |
|
6 |
Install other fixing parts, and adjust their relative positions according to the on-site engineering situation. Then screw all bolts tight, as shown in Figure 5-6. |
|
1. Diamond-shaped nut |
2. Cabling frame |
3. Fixing bracket |
4. Bolt M8 × 20 |
|
5. Bolt M8 × 25 |
6. Insulation washer |
7. Insulation plate |
8. Cabinet |
Figure 5-6 Install the cabinet on a cabling frame with a side trough (H £ 200 mm)
5.2.2 Fixing Cabinet on a Cabling Frame with a Side Trough (H > 200 mm)
Уважаемый посетитель!
Чтобы распечатать файл, скачайте его (в формате Word).
Ссылка на скачивание - внизу страницы.