Answer
A. Open RegEdit.exe, usually found in C:\Windows.
B. Open HKEY_CURRENT_USER\Software\Microsoft\Office\9.0\MS Project.
C. Right-click the Options folder, point to New, and then click Key.
D. Type Accessibility as the name of the new folder, and then press ENTER.
E. Right-click the Accessibility folder, point to New, and then click DWORD Value.
F. Type EnableControlTooltips as the name of the value, and then press ENTER.
G. Click EnableControlTooltips, click Edit, and then click Modify.
H. In the Value Data box, type 1, and then click OK.
I. Click Registry, click Exit, and then restart Microsoft Project.
![]()
Try This: Display Additional Screen Tips
1. Press the F1 button to call online help.
2. Query the Office Assistant using key words such as “accessibility.”
How do you automatically display additional screen tips?
Microsoft Project 2000 includes the option to automatically save a file at predefined intervals. It can be set to save only the active project or to automatically save all open files. AutoSave is located on the Tools menu under Options on the Save tab.
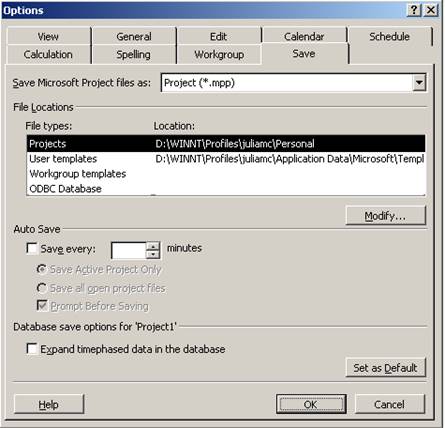
Figure 1 – Autosave/Default Save Format and Path
![]()
Note that this feature is simply a timed save only. It should not be confused with Microsoft Word’s AutoRecover feature.
Microsoft Project 2000 now lets you set both the default file format and the default directory when saving your project. Different directories can also be specified for project files, user templates, and workgroup templates. This feature is located on the Tools menu under Options on the Save tab.
Microsoft Project 2000 now allows you to select a task by clicking on its Gantt bar. This helps you to determine more easily to which task a given Gantt bar belongs.
In Microsoft Project 98, you could use a fill handle to populate cells in a time-phased view such as Task Usage. However, you could not do this in a table such as the left-hand portion of the Gantt Chart view. Microsoft Project 2000 now gives you this capability.
Fill handles make fill up or down operations easier. To try this feature, go into a table in the Gantt Chart view and select the cell that you want to copy. In the lower right hand corner, you will notice a small square. Click and drag the square to highlight the other cells within the same column that you want to populate.Releasing the mouse button populates the highlighted cells with the information within the original cell.
Microsoft Project 2000 allows you to group tasks and resources based on criteria you define. This allows you to view rolled up totals and other information for criteria that are important to you. Grouping is covered in greater detail later on in this course.
Microsoft Project 2000 allows you to specify your own WBS numbering format. Additionally it allows you to create multiple outline structures in custom fields. These allow you to sort and group information based on predefined outline codes. WBS and Outline Codes will be covered in further detail later on in this course.
Уважаемый посетитель!
Чтобы распечатать файл, скачайте его (в формате Word).
Ссылка на скачивание - внизу страницы.