All fracture toughness tests, by design, inspect sharp crack growth behavior. However, a significant advantage of the Double Torsion (DT) fracture toughness test is that the specimen dimensions are good for both laser treatment and crack resistance testing. Nadeau and Dickson [4] also used the DT test to inspect the toughening effects of induced stresses via secondary phases. Furthermore, when compared with three- and four-point flexure tests, the DT test does not require numerous specimens to build statistically valid dependencies since the DT measures the incremental increase of the apparent fracture toughness (AFT) on each individual sample.
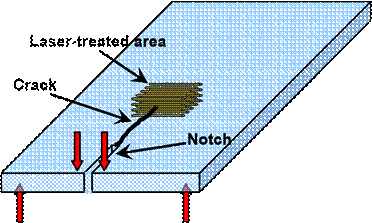
The DT test [5] has been in use by the fracture mechanics community since the 1970’s. Figure 2 illustrates that the specimen configuration is a thin plate with a simple initial notch/crack between a fourpoint style loading across this notch. This loading generates torsion on two beams which, in turn generates a mode I fracture process along the middle of the plate. A typical specimen size is similar to a microscope slide, i.e. 1 by 3 inches, but is not limited to that specific geometry. Reference [5] can provide many more details about the test including the load-totoughness conversion formulae.

Fig. 2. Specimen configuration in the Double-Torsion test.
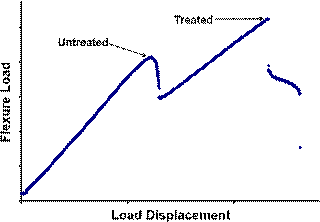
The basic test process was to form, or drive a crack up to the process zone, stop the crack growth by unloading, and then reloading to measure the peak load to push the crack through the zone, and, hence to calculate the apparent fracture toughness. Figure 3, below, is a typical load-displacement curve from two DT tests.
In the first step, the load is increasing until the crack is initiated from the notch. This load corresponds to the first peak on the curve and it gives the fracturetoughness value for the untreated original glass. The load is then reduced allowing the crack to grow stably and slowly to reach the laser-treated zone. If laser irradiation produced a strengthening effect the load needs to be increased to drive the crack through this zone. This reloading is shown in Fig. 3 as a second slope, which peaks at a higher level marked as “Treated” when the crack propagates through the exposed zone. The difference in the two peak loads allows calculation of the ATF increase resulting from laser “tempering”.

Fig. 3. Typical DT load-displacement curve.
Results
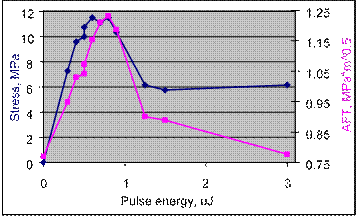
The residual stress outside the exposed area and the fracture toughness versus the laser pulse energy are plotted in Fig. 4. Both parameters go up with pulse energy until ~ 0.8 µJ when they reach the maxima. After that the stress and the fracture toughness decrease and stay flat or decrease slightly for pulse energies above ~ 1.25 µJ. As one can see, the fracture toughness was beyond 60% at the peak.

Fig. 4. Residual stress and AFT as a function of laser pulse energy in the soda-lime (0215) glass.
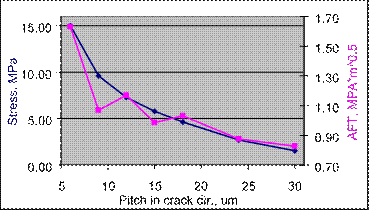
We measured the effect produced by the distance between the laser-written tracks in the crackpropagation direction on the residual stress and on the AFT in soda-lime glass. The results are plotted in Fig. 5 below.

Fig. 5. Residual stress and AFT vs. the distance between the laser-written lines in the crackpropagation direction.
Уважаемый посетитель!
Чтобы распечатать файл, скачайте его (в формате Word).
Ссылка на скачивание - внизу страницы.