Contents
9 Installing Doors and Side Panels of the Cabinet 9-1
9.1 Installing Side Panels 9-2
9.1.1 Procedure 9-2
9.1.2 Installation Check 9-3
9.2 Installing Front and Rear Doors 9-5
9.2.1 Installing the Plastic Panel 9-5
9.2.2 Procedure 9-6
9.2.3 Opening the Door 9-8
9.2.4 Closing the Door 9-9
9.2.5 Installation Check 9-9
9.3 Affixing the Cabinet Labels 9-11
9.3.1 Procedure 9-12
9.3.2 Installation Check 9-12
9.4 Installation Check Points 9-13
Figures
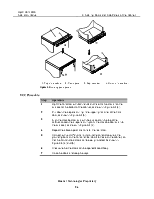
Figure 9-1 Installing side panels of the cabinet 9-3
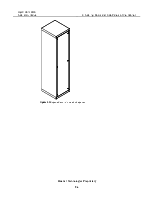
Figure 9-2 Expected result of installed side panels 9-4
Figure 9-3 Installing plastic panels 9-6
Figure 9-4 Installing the front and rear doors of the cabinet 9-7
Figure 9-5 Connecting grounding wires of the doors 9-8
Figure 9-6 Opening the door of cabinet 9-9
Figure 9-7 Closing the door of the cabinet 9-9
Figure 9-8 Expected result of installed front/rear door 9-10
Figure 9-9 Position numbers of equipment in the equipment room 9-11
Figure 9-10 Outer views of the cabinet labels 9-12
Tables
Table 9-1 The contents of Chapter 9 9-1
Table 9-2 Content of cabinet label 9-11
|
Overview |
This chapter tells you the procedures and precautions for installing the doors (front door and rear door) and side panels of the ETSI cabinet, which is 600 mm deep. On one hand, the doors and side panels can, as an electromagnetic shielding layer, protect the equipment inside the cabinet against electromagnetic interference (EMI). On the other hand, they protect the equipment from being exposed outside, so the equipment will not be damaged. Generally, the side panels are installed first, then the front door. Finally, the cabinet label is affixed to the front door. |
|
Contents |
Table 9-1 shows the contents of this chapter. |
Table 9-1 The contents of Chapter 9
|
Title |
Content |
|
9.1 Installing Side Panels |
Introduces the relevant operations and procedures for installing side panels of the cabinet. |
|
9.2 Installing Front and Rear Doors |
Introduces the relevant operations and procedures for installing the front and rear doors of the cabinet. |
|
9.3 Affixing the Cabinet Labels |
Introduces the relevant operations and procedures for affixing the cabinet label. |
|
9.4 Installation Check Points |
Checks the installation result to see whether the cabinet installation is finished. |
9.1 Installing Side Panels
|
Overview |
This section tells you the steps and precautions for installing the side panels of the ETSI cabinet, which is 600 mm deep. |
|
Prerequisites |
n The cabinet has been secured. n Fiber jumpers and cables have been installed. |
|
Installation materials |
n Side panels n Screws |
9.1.1 Procedure
Уважаемый посетитель!
Чтобы распечатать файл, скачайте его (в формате Word).
Ссылка на скачивание - внизу страницы.