 The
help is displayed in a new window on the left hand side of the screen. Topics
are listed on the left side and the right side displays the help for that
topic.
The
help is displayed in a new window on the left hand side of the screen. Topics
are listed on the left side and the right side displays the help for that
topic.
The Hide button can be pressed to hide the topics. The button then turns to say SHOW. If that is pressed the topic list re-appears.
If help is no longer required it can be closed by selecting the ‘x’.
· Close the help using the button in its
top right hand corner. ![]()
Each of the three mouse buttons performs a different operation in PowerSHAPE. By using the ALT, Ctrl or Shift key, these operations can be extended as the following details explain.
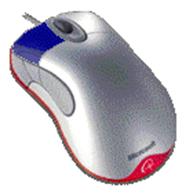
This button is used for selecting items off the main pull down menus, inputting and selecting parts of the model.
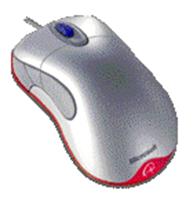 Zooming: - Hold down the CTRL key and
button/wheel and move the mouse up and down to zoom in and out of the view.
Hold down the CTRL, Shift Key and button/wheel to select an area by box to zoom
into.
Zooming: - Hold down the CTRL key and
button/wheel and move the mouse up and down to zoom in and out of the view.
Hold down the CTRL, Shift Key and button/wheel to select an area by box to zoom
into.
Panning: - Hold down the SHIFT key with the button/wheel and move the mouse in the direction you want to see.
Rotating: Hold down button/wheel and move the mouse. A tracker ball shows the rotation as does the view orientation axis in the bottom left corner of the screen. If view spinning is on the view will spin around until you click again.
The wheel can be used to scroll text, if your mouse has a wheel.
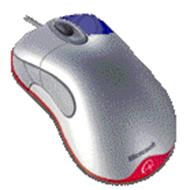
When this button is pressed it brings up a new menu based on whatever the mouse is over. If nothing is selected, the View menu appears. If a line is selected, for example then the Line menu appears.
For this exercise you will be opening a stored model and then changing the views around and using the dynamic option.
· Click on File, select the option Open.

All of the models that are available in PowerSHAPE are shown. Selecting the model will display a thumbnail picture of the model for a visual check.
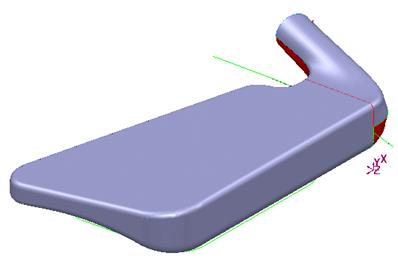
· Select the model golf-fin and press Open.

When a model is opened it is shown in a view down the Z-axis.
The view toolbar, on the right hand side of the PowerSHAPE window, can be broken down into 3 main areas, standard views, dynamics and shading.
· Select the view Iso 1 ![]()
The model is now positioned in an isometric view. To provide better clarity a shaded version can be shown, instead of the wireframe.
· Select Shaded view![]()
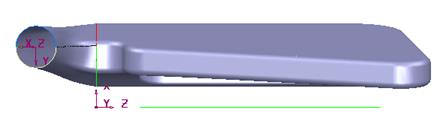
The surfaces have been shaded in to make it look like a completed model. The wireframe is also shown. The model can be rotated dynamically so the underneath can be seen.
· Hold down the middle mouse button and move the mouse around to display the underside.
· Hold down Shift and Middle mouse button and move mouse to get model in view.

The underside can now be seen clearly. There are many different options for viewing the model that you can select. There are also a variety of keyboard shortcuts that you can use.
· Select Views è Single [about selection]
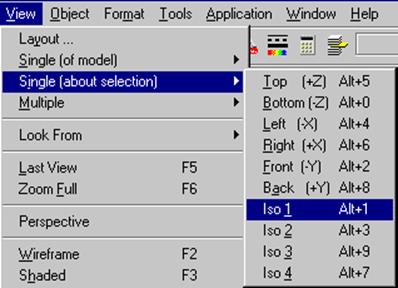
The keyboard shortcut for the views are listed, i.e. Alt + 1 for Iso 1. By switching Num Lock on your keyboard, you can use the number pad with the Alt key to change the views.
There is also a Perspective Mode option, which displays the model in any view as in real life with the parts nearer the front shown larger and the parts further away seem smaller.
· Select Back [+Y].
Another view is displayed. The PowerSHAPE model needs to be closed. In this case it does not need to be saved, as the model has not been altered.
· Select File è Close.

A message box appears asking if you want to lose these changes. No changes have been made so the answer is YES. If you say No the model will not close.
· Select Yes.
The model called golf-fin is closed and this leaves the New-Model_1:1 open to work on if requires. This model needs to be closed to exit PowerSHAPE. To close this model and exit PowerSHAPE at once, select Exit.
· Select File è Exit.
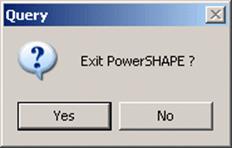
A message box appears asking if it is okay to exit PowerSHAPE.
· Select Yes.
PowerSHAPE has been closed.
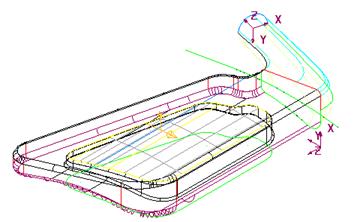
PowerSHAPE models can consist of a variety of different entities, which fall into three main types, wireframe, surfaces, and solids.
Wireframe items include lines, arcs, curves, points, text, dimensions etc. These can be 2D or 3D and are essential for drafting in addition to generating most types of surfaces or solids.
Surfaces can be generated from wireframe, created directly as standard primitive shapes, or by conversion from a solid model. A surface is a skin stretched across the 4 sided elements of a wireframe network. A 3D model created as surfaces behaves as a hollow form.
Solids are generated directly from wireframe, created directly as standard primitive shapes, or by the conversion of a selection of surfaces. A 3D model created as a solid behaves as an enclosed mass.
Уважаемый посетитель!
Чтобы распечатать файл, скачайте его (в формате Word).
Ссылка на скачивание - внизу страницы.