The last file that needs to be customized for the dialog box is the Excel1.Lab file. The .lab files are used by the reporting features of CHEMCAD (output >resulsts, output >reports, tools >specsheet). Reports are made using the labels specified in the .lab file with the variable specified.
The Excel1.lab file is found in the job directory and is opened with Notepad just as Excel1.Map was. The file will read as below.
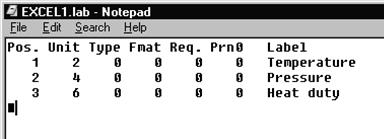 |
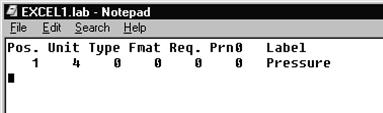
This file must be edited in a similar manner to the Excel1.Map file. The “Temperature…” and “Heat duty…” lines are deleted. The first number on the pressure line, 2, is changed to a 1. This instructs CHEMCAD that the first variable should be labeled “Pressure”. The file should now look like the one below. Save the file and then close.
The new dialog box is finished. To test, go back into CHEMCAD and open the Excel job. Double click the Excel Unit Op and make sure Excel1 is in the first entry field of the dialog. This field will be empty if it was deleted in the first part of the tuturial. Now click [OK] for the first dialog box with the file paths. The second dialog box should come up with a Pressure field available to have data entered into it. Enter the pressure of 20 psia and click [OK].

Now run specsheet for the unit op. This command is found under Tools on the menu bar. An Excel spreadsheet should come up for the unit op. On the part of the spreadsheet labeled “UNITOP DATA FROM CHEMCAD” are all the variables, parameters, units and values listed for the Excel Unit Op. The only value that should be here is Pressure with a value of 20. The item to take note of here is the variable number for Pressure. In this case it is 2. This will be needed for the visual basic code.
Close Specsheet.xls and open the Excel1.xls file. Open the Visual Basic code that was programmed in part one of the example. Only one section of code needs to be changed.
' If inletPresPsia(1) <= inletPresPsia(2) Then outletPresPsia(1) = inletPresPsia(1) Else outletPresPsia(1) = inletPresPsia(2)
If myUnitPar(2) <> 0 Then
outletPresPsia(1) = myUnitPar(2)
Else: If inletPresPsia(1) <= inletPresPsia(2) Then outletPresPsia(1) = inletPresPsia(1) Else outletPresPsia(1) = inletPresPsia(2)
End If
myUnitPar is an array of the unit op specification variables, as seen on the specsheet report. The number 2 corresponds to the number noted of on the spec sheet. The 2nd element of the myUnitPar array is the pressure specification. Note that the first element of myUnitPar is reserved.
The first line shown is the line of code that needs to be changed. This line of code previously set the pressure. Put an apostrophe in front of this line to make it a comment. Comment code is not executed when the program runs.
Next, type in the second line above with the myUnitPar variable checks to see if a pressure is entered into the created dialog box. If the pressure was specified in the dialog, it will will be stored as myUnitPar(2) . This is an array with all the unit op variables as seen on the spec sheet. The 2nd element of myUnitPar() corresponds to the 2nd parameter of the unit op. Viewing this unitop with specsheet, we confirmed that the 2nd parameter of this unitop is Pressure. This code will set the outlet stream pressure to the input value, myunitPar(2). If that value equals zero then no number was entered into the dialog box and a default pressure will be used as the outlet pressure. The default pressure is the lowest pressure of all the incoming streams. The line of code for this corresponds to the same line of code for setting the outlet pressure in section one of the tutorial. Save the file and exit. Run the Unit op in CHEMCAD.
Уважаемый посетитель!
Чтобы распечатать файл, скачайте его (в формате Word).
Ссылка на скачивание - внизу страницы.