Contents
2 Installing Subrack 2-1
2.1 Install the Subrack 2-2
2.1.1 Procedure 2-2
2.1.2 Installation Check 2-4
2.2 Installation Check Points 2-5
Figures
Figure 2-1 Install the captive nut 2-2
Figure 2-2 Install the subrack 2-3
Figure 2-3 Expected result of installed subrack 2-4
Tables
Table 2-1 The contents of Chapter 2 2-1
Table 2-2 Positions where the front and rear mounting brackets are fixed 2-2
|
Overview |
This chapter describes the procedures and precautions for installing the subrack. In most cases, the subrack has been installed properly in the cabinet, and does not need to be installed on the site. If it is necessary to install it on the site, refer to this chapter. |
|
Contents |
Table 2-1 shows the contents of this chapter. |
Table 2-1 The contents of Chapter 2
|
Title |
Content |
|
2.1 |
Introduces the relevant operations and procedures for installing the subrack. |
|
2.2 Installation Check Points |
Introduces installation checkpoints and the precautions. |
2.1 Install the Subrack
|
Overview |
This section tells you how to install the subrack. |
|
Prerequisites |
The subrack is fixed in the cabinet with the front and rear mounting brackets. In most cases, captive nuts have been installed at the positions for mounting brackets before delivery. If they have not been installed, install them referring to Figure 2-1. Table 2-2 shows the positions on the cabinet where the front and rear mounting brackets are fixed. |
Table 2-2 Positions where the front and rear mounting brackets are fixed
|
Position |
Hole position (2.2 m cabinet) |
|
Front mounting bracket |
9, 17, 32, 40 |
|
Rear mounting bracket |
26, 34 |
Note: The holes are numbered from the bottom up, and the lowest part of the cabinet is numbered as 1.
|
1. Captive nut |
2. Installation hole |
3. Slide rail |
Figure 2-1 Install the captive nut
2.1.1 Procedure
|
Step |
Operation |
|
1 |
Determine the installation position for the subrack, and do not mistake the subrack face for the back, or conversely back for the face. |
|
& Note: There are 32 slots of 30.48 mm wide on the face of the subrack, while 26 slots of 30.48 mm, 50.8 mm and 60.96 mm wide on the back. |
|
|
2 |
Put the subrack on the subrack side rail, with two persons holding the handles at both sides of the subrack respectively, and push it in carefully, as shown in Figure 2-2. |
|
3 |
Use screws to fix the subrack, through the holes on the front mounting bracket, onto the front post of the cabinet. |
|
4 |
Install the rear mounting bracket of the subrack, and fix the subrack onto the rear post on the cabinet with screws. |
|
1. Subrack |
2. Handle |
3. Front mounting bracket |
|
4. Slide rail |
5. Rear mounting bracket |
Figure 2-2 Install the subrack
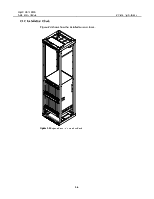
2.1.2 Installation Check
Figure 2-3 shows how the installed subrack looks.
Figure 2-3 Expected result of installed subrack
2.2 Installation Check Points
n Idle slots on the subrack should be free of foreign articles and water stain.
n Screws have been tightened.
n The subrack appears clean with no scratch, loosened parts or disrepair.
n Connectors on the subrack system backplane should be complete and tidy without any bent or distorted pin.
n The dismounted wire-binding part has been properly installed.
Уважаемый посетитель!
Чтобы распечатать файл, скачайте его (в формате Word).
Ссылка на скачивание - внизу страницы.