A point has an angle before and after the point. It they are the same angle, the point is smooth.
![]()
· Select the Tangent Direction icon.

The Direction form appears. The current angles are filled in. In this case you have a YZ angle of 90 degrees, going through the point.
![]()
· Change the ZY angle to 45 degrees.
· Accept the direction form and press Accept on the tangent editor form.

The angle flowing through the point has changed, giving a slight indent to the surface.
A discontinuity can be defined by setting the options before and after the point to different values. The before and after depend upon the way the points are flowing along the lateral.
· ![]() Select lateral 7 point 1.
Select lateral 7 point 1.
· From the Curve edit toolbar, select Edit Tangent Angles.
· Select the Before option. ![]()
· ![]() Select the Tangent Direction icon.
Select the Tangent Direction icon.
· Enter a ZY angle of 30 degrees.
· Accept the direction form and press Accept on the tangent editor form.

The angle has now been changed going into or before the point, giving a discontinuity in the surface.
The angle after the point can also be changed in the same manner.
· Delete the surface.
As surfaces are altered by the points on the laterals or longitudinals it is often necessary to add extra curves into the surface. Also these laterals or longitudinals can also be deleted, when it will not affect the shape of the surface adversely.
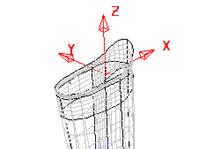
Surfaces can also be defined by parameters. Each position on the surface has a parametric value defined in terms of T and U, and every laTeral (T) or longitUdinal (U) is given a whole number. So at any position on lateral 1, the parametric value of T would be 1. At any position on longitudinal 4, the U Value would be 4. A position on a surface halfway between lateral 3 and 4 and halfway between longitudinal 5 and 6 would be T3.5 and U5.5.
· Create a cylinder of radius 10 and length 100 up the Z-axis.
· Convert the surface.
· Move point 3 on lateral 2 in X by -20.
· Move point 1 on lateral 2 in X by 5 and Z by 10.
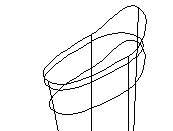
This is the basic shape to which additional laterals are going to be added.
Add in a new lateral halfway from lateral 1 to lateral 2. In parameter terms this is described as 1.5.

· Double click the surface to bring up the toolbars.
· From the surface edits toolbar, select Add Curve.

This form displays the options that can be used to make new laterals within a surface.
When a lateral is made, they are automatically renumbered.
· Select the Parameter Value tab and enter a value of 1.5.
· Select Apply and Dismiss.

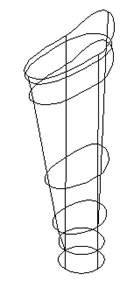
A new lateral is added to the surface.
The new lateral; which has become lateral 2, lies completely in the middle of the surface. The top lateral, which was lateral 2, is automatically renumbered to 3.
To dynamically add an additional lateral within the defined surface use CTRL and the Left mouse button.
· Click point 2 on lateral 1.
· Hold down CTRL + Left mouse button and drag the point up the surface (a temporary purple lateral appears).
Moving the mouse around will show a purple construction line. (Keeping along the longitudinal will ensure that only a lateral is created, and vice versa).
· Release the mouse button when the purple lateral is somewhere between lateral 1 and 2.

A new lateral has been created.

To Dynamically add a new lateral 30mm above lateral 4 (the top lateral), a different command is used as the surface needs to be extended.

· Select lateral 4
· From the Edit toolbar, select Point Limit.
· Using the Left mouse button, select this lateral at a point with the magnet and drag the top lateral up the construction line until it says 30.
· Release the mouse button.

This action creates a new lateral, extending the surface in the same direction.
New laterals can also be added at the intersection with a workplane.
· Create a workplane at 0 0 112.5.
· Select the surface and Add Curve.
· Select the Workplane Intersection tab and an offset of 0.

A temporary plane appears to allow you to visually confirm the new lateral position.
· Press Apply, and then Dismiss.
A planar lateral is fitted into the surface. Whole curves (laterals and longitudinals) can be deleted.
· ![]() Delete the workplane.
Delete the workplane.
· Select Lateral 2 and select delete the curve.
Laterals or longitudinals made from wireframe can be added into surfaces. Note: the composite curve must have the same number of points in that the surface has. The points need to be aligned and flowing the same way to ensure the surface is not twisted.
·  Create a circle
at 0 0 10 with a radius of 10 and create a composite curve
of the circle.
Create a circle
at 0 0 10 with a radius of 10 and create a composite curve
of the circle.
· Select the surface and Insert curve from wireframe.

The form pops up. The wireframe is not yet selected, as the cross indicates.
· Select the wireframe and change Insert to be After and Curve to be 1.
· Press Accept.
The surface now has a new lateral in. The wireframe must have the same number of points as the surface to be fitted in.
All of these commands can be applied to longitudinals, and work in exactly the same manner.
Laterals can be edited as a complete object by using the edit toolbar.
· Select the bottom lateral (lateral 1). Open the edit toolbar.
Even though a lateral is selected all of the edit operations work on the complete surface. To work on the selected curve, press in the object icon and note the change in the toolbar.
· ![]() Select (Switch on)
the object icon.
Select (Switch on)
the object icon.

· Select offset and enter a value of 5.

The bottom lateral is now offset by 5 mm all around.
· Select Fileè Close and then Yes.
Уважаемый посетитель!
Чтобы распечатать файл, скачайте его (в формате Word).
Ссылка на скачивание - внизу страницы.