Notice that the Windows Account field is used strictly with Microsoft Project Central. It does not affect e-mail based messaging at all. Thus if you have a resource with a Windows Account set but no e-mail address entered, Microsoft Project will still attempt to resolve an address for the resource based on the resource name and will not look at the Windows Account information.
Customizing workgroup messages has changed slightly in Microsoft Project 2000. You can now add virtually any task field from your project to your message. This greatly increases the information you can send. Although the User Interface has changed slightly, all the options for customizing Workgroup Messaging have remained the same.
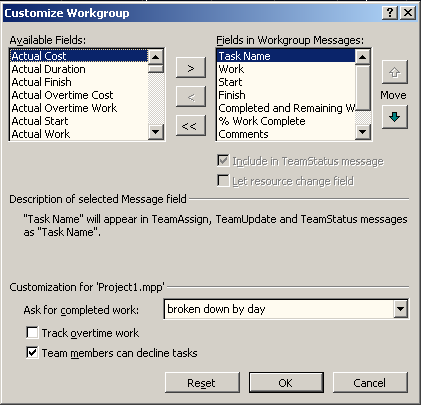
Figure 5 - Customize Workgroup
Because little has changed with e-mail based workgroup messaging in Microsoft Project 2000, we have a good idea of where users may run into problems. Let’s take a quick look at what’s going on behind the scenes in two of these areas and then look at troubleshooting different scenarios.
One area that’s good to understand is what happens when a message is opened. When a Workgroup message is sent to a mail recipient that recognizes custom messages, it is recognized as a custom message by a hidden file named WINMAIL.dat. Once the message is recognized as a custom message it searches the registry key HKEY_CURRENT_USER\Software\Microsoft\Mail\ Custom Messages and MSMAIL32.ini files for further instructions.
The custom messages sections in the Registry and MSMAIL32.ini files direct the Workgroup message to the OPML32.dll file. This file examines the message, extracts the usable data, and passes it on to OPENMAIL.exe.
When the message is passed on to OPENMAIL.exe, the user momentarily sees a dialogue box with the title Opening Project Mail, followed by a dialogue box similar to the one below (depending upon the type of workgroup message being opened).
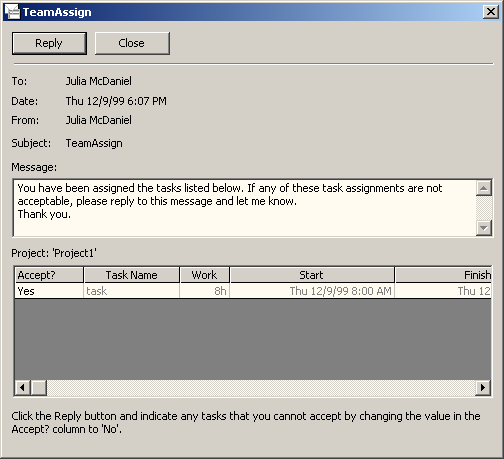
Figure 6 - Workgroup Messaging
The MSFLXGRD.ocx file controls the grid where the resource’s information is entered such as Accept, Work, Start and Finish dates.
Another area where it is good to understand what’s going on behind the scenes is Microsoft Project’s integration with Microsoft® Outlook®. Microsoft Project 2000 is designed to integrate with Microsoft Outlook. When WGSETUP is run, it adds the menu item New Team Status Report under the Actionsmenu of Microsoft® Outlook® 98 and Microsoft® Outlook® 2000. This same menu item is added under the Tasksmenu of Microsoft® Outlook® 97. This menu item, which is used to send unsolicited Team Status reports, is visible only when looking at the Task View from within Outlook. When the recipient accepts a Team Assign message, the task name is added to the recipient’s task list in Outlook.
The New Team Status Reportmenu option is automatically available after WGSETUP.EXE is run. If there is no New Team Status Reportmenu item after running WGSETUP.EXE, it can be added by following the steps below:
1. Search the customer’s hard drive for a file names OLMENU.ecf. This is an add-in file that Outlook uses to insert the New Team Status Report menu item.
2. From within Outlook 98 or Outlook 2000, click on Tools, Options and then click on the Other tab.
(For Outlook 97 click on Tools, Options, General tab, Add-In Manager)
3. Click on Advanced Options… and click on Add-in Manager.
4. There should be an entry that reads Team Status Form. If it is not already selected click to select it.
(If there is no Team Status Form listed, click Install… and browse to where the OLMENU.ecf file is located. If this file is not on your hard disk then you will need to copy it from the installation CD.)
5. Once the OLMENU.ecf file is located, click Open and OK to the remaining dialogue boxes.
Уважаемый посетитель!
Чтобы распечатать файл, скачайте его (в формате Word).
Ссылка на скачивание - внизу страницы.