3.1.1 Positioning an Independently Installed Cabinet
|
Step |
Operation |
|
1 |
Determine and mark the positions of reference points for installing the cabinet according to the construction drawing. |
|
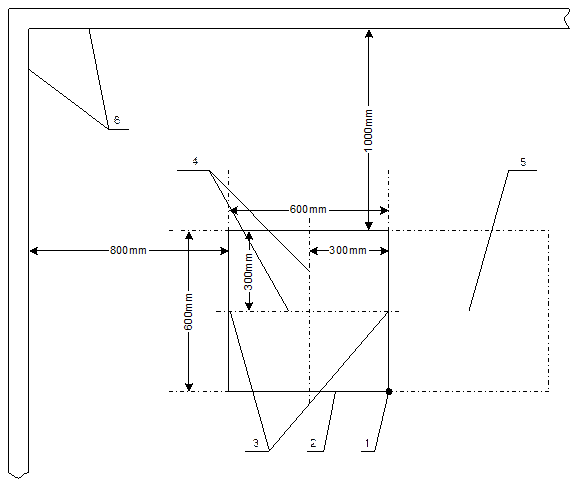
2 |
Based on the direction specified in the construction technical documents, draw a 600 mm x 600 mm rectangle as shown in Figure 3-1 according to the installation reference points, and then mark the central lines for the cabinet. |

|
1. Installation reference point |
2. Central lines for cabinet |
3. Front outline |
|
4. Side outline |
5. Inner wall |
Figure 3-1 Position an independently installed cabinet
3.1.2 Positioning a Cabinet Close to Another One
|
Step |
Operation |
|
1 |
Determine, with a plummet, and mark the side projective position (on the ground) of the cabinet already installed. |
|
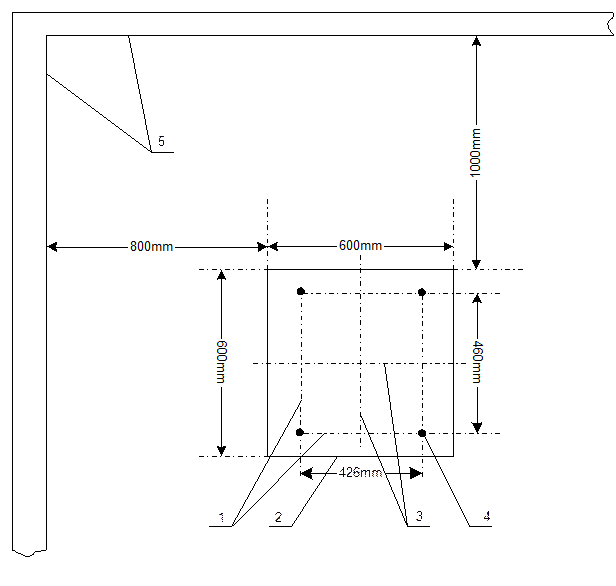
2 |
According to the marks made in step 1, draw the side outline (close to the neighbor cabinet already installed) of the cabinet to be installed. |
|
3 |
According to the front outline of the cabinet already installed, draw that of the cabinet to be installed to determine the positions for the installation reference points. |
|
4 |
Draw a 600 mm x 600 mm rectangle as shown in Figure 3-2 as per the installation reference points, and then draw the central lines for the cabinet. |
|
1. Installation reference point |
2. Front outline of the cabinet |
3. Side outline of the cabinet |
|
4. Central lines for cabinet |
5. Installed cabinet |
6. Inner wall |
Figure 3-2 Position a cabinet close to another one
3.1.3 Installation Check
The position for the cabinet should meet the requirements below:
n The distance between two rows of cabinets is not less than one meter.
n The distance between the cabinet side and the wall is not less than 800 mm.
n The distance between the front/back of the cabinet and the wall is not less than one meter.
n A path of at least one meter wide is reserved in the equipment room.
n The cabling hole on the top of the cabinet is aligned to the lower part of the cabling trough of the equipment room.
3.2 Positioning the Support
|
Overview |
This section tells you how to determine the position where the support will be installed. |
|
Prerequisites |
The position where the cabinet will be installed has been determined. |
3.2.1 Procedure
|
Step |
Operation |
|
1 |
Draw a 460 mm x 426 mm rectangle as per the central lines, as shown in the dotted-line frame in Figure 3-3. |
|
2 |
The four vertexes of the rectangle are just the mounting holes for the support. Mark them with a marking pen. |
& Note:
Check all the mounting holes against the support to eliminate any possible mistakes.
|
1. Central lines for the support mounting holes |
2. Cabinet outline (front) |
|
3. Central lines for the cabinet |
4. Mounting hole for the support |
|
5. Inner wall |
Figure 3-3 Support mounting holes for a single cabinet
3.2.2 Installation Check
n The positions for installing the support are correct and meet the requirements in the construction drawing.
n For any technical issues, contact the local office of Huawei promptly.
3.3 Installing the Support
Уважаемый посетитель!
Чтобы распечатать файл, скачайте его (в формате Word).
Ссылка на скачивание - внизу страницы.