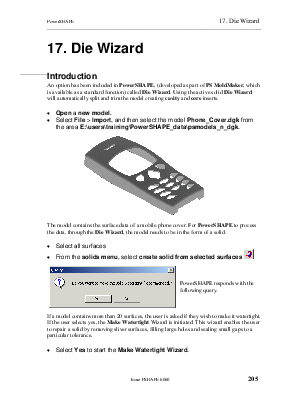
An option has been included in PowerSHAPE, (developed as part of PS MoldMaker, which is available as a standard function) called Die Wizard. Using the active solid Die Wizard will automatically split and trim the model creating cavity and core inserts.
· Open a new model.
· Select File > Import, and then select the model Phone_Cover.dgk from the area E:\users\training\PowerSHAPE_data\psmodels_n_dgk.

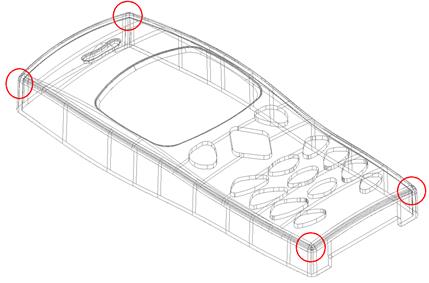
The model contains the surface data of a mobile phone cover. For PowerSHAPE to process the data, through the Die Wizard, the model needs to be in the form of a solid.
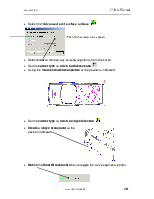
· Select all surfaces
· From the solids menu, select create solid from selected
surfaces ![]()

PowerSHAPE responds with the following query.
If a model contains more than 20 surfaces, the user is asked if they wish to make it watertight. If the user selects yes, the Make Watertight Wizard is initiated. This wizard enables the user to repair a solid by removing sliver surfaces, filling large holes and sealing small gaps to a particular tolerance.
· Select Yes to start the Make Watertight Wizard.

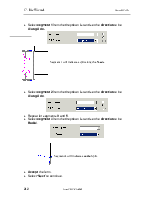
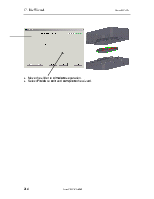
The first page of the wizard allows the user to specify a linking tolerance. It also identifies any large holes, large gaps and small gaps. In the above example four small gaps have been identified that need to be repaired in order to make the solid watertight.
·  Select a Wireframe view to see the areas that
contain the small gaps (displayed in Yellow)
Select a Wireframe view to see the areas that
contain the small gaps (displayed in Yellow)
· Select Advanced.![]()

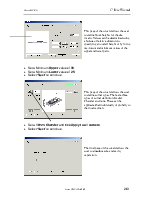
This page of the wizard allows the user to specify how, if at all, large gaps are filled. Options exist to allow the wizard to automatically fill the gaps within a specified range, or to create wireframe around the edges of gaps for the user to fill manually.
In this example it will not be necessary to fill any large gaps.
· Select No, Skip large hole repair. ![]()
· Select ‘Next’ on the form.
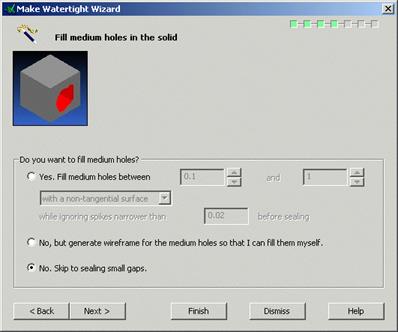
This page of the wizard allows the user to specify how, if at all, medium gaps are filled. Options exist to allow the wizard to automatically fill the gaps within a specified range, or to create wireframe around the edges of gaps for the user to fill manually.
In this example it will not be necessary to fill any medium gaps.
· Select No, Skip to sealing small gaps. ![]()
· Select ‘Next’ on the form.
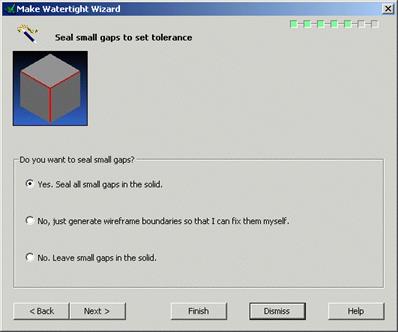
This page of the wizard allows the user to specify how, if at all, small gaps are sealed. Options exist to allow the wizard to automatically seal the gaps, or to create wireframe around the edges of gaps for the user to seal manually.
· Select Yes, seal all small gaps in the solid. ![]()
· Select ‘Next’ on the form.

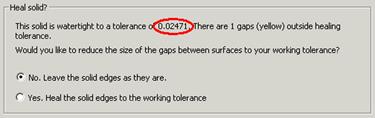
This page displays the calculated watertight tolerance of the model. To improve on the calculated tolerance the edges of the solid can be healed to reduce the size of gaps between surfaces.
· Select Yes. ![]()
· Select ‘Finish’ on the form.
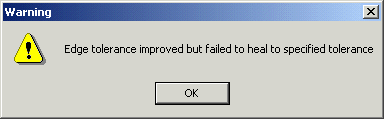
PowerSHAPE attempts to heal the edges of the model to the specified tolerance of 0.01 and returns with the message.
· Select OK to continue.
The watertight tolerance has been improved but PowerSHAPE cannot heal the model, in this instance, to the specified healing tolerance
· Select ‘No’ and ‘Finish’
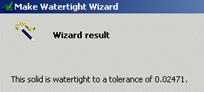
The result of the make watertight wizard is diplayed.
· Select Dismiss.
The model is now Watertight and ready for the Die Wizard. Although recommended it is not always essential for the model to be watertight for it to run through the Die Wizard.
· Select the model.
· From the Solid Wizard ![]() , select Die Wizard.
, select Die Wizard. ![]()
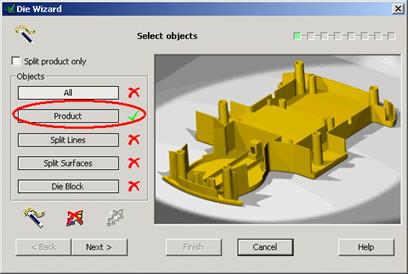
The first page of the Die Wizard allows the user to select the objects to be used for die creation.
Уважаемый посетитель!
Чтобы распечатать файл, скачайте его (в формате Word).
Ссылка на скачивание - внизу страницы.