ADuC812 MicroConverter™ GetStarted Guide
an introductory tutorial for use of the ADuC812 QuickStart™ Development Kit
INSTALLATION:
Installing from CD:
- Insert the QuickStart™ CD ROM into you CD ROM drive and double-click on the “SetUp” icon.
- Follow the instructions to install the software on your PC.
Installing from the Web:
- Go to www.analog.com/microconverter/quickstart.html and click on “Complete Software Package Download”.
- Save the “SetUp.exe” file on your PC’s hard drive.
- Double-click the “SetUp” icon to launch the software installation routine.- Follow the instructions to install the software on your PC.
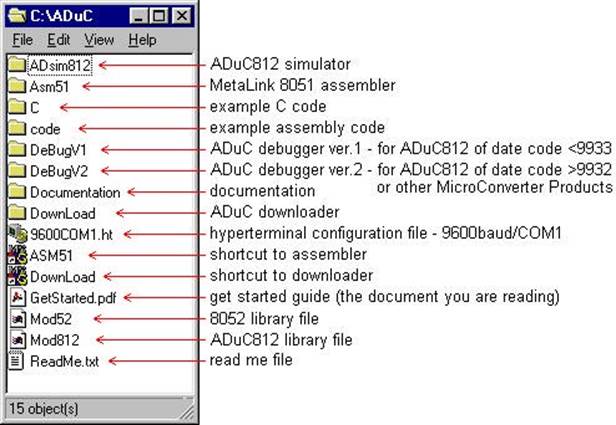
note: Though you can install the software onto any hard drive and into any directory you wish, for the purposes of simplicity the rest of this document will assume that you’ve installed at the default location of C:\ADuC.
A successful installation will place the following files and directories on your hard drive:
This document presents a brief introduction to the use of following tools:
- MetaLink’s 8051 assmebler
- the ADuC downloader
- the ADuC debugger (both versions)
THE METALINK ASSEMBLER:
1.
In the ADuC directory, double-click on the ASM51 icon (![]() ).
).
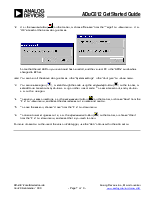
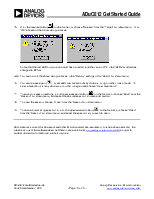
2. In the DOS window that comes up, type the relative path of the assembly file you wish to assemble. For example, if you wish to assemble the example file C:\ADuC812\code\blink.asm, simply type “code\blink.asm” as shown below.
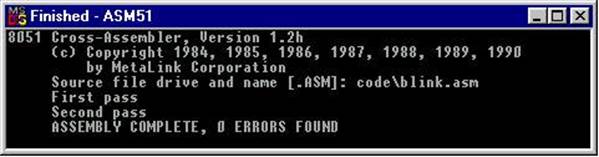
The assembler will display the text “ASSEMBLY COMPLETE, 0 ERRORS FOUND” indicating that it has successfully assembled the file and has created the hex and list files (eg. blink.hex & blink.lst) along side the assembly input file (eg. blink.asm). If the assembler indicates assembly errors, you should view the list file (eg. blink.lst) to examine the errors. To view the list file, open it with notepad or any standard text editor.
note: If the assembler returns an error message indicating a failure to read drive A, or a fatal error opening a file on the A drive, then it is most likely failing to find the MOD52 or MOD812 file referenced by the assembly file. Make sure both MOD52 and MOD812 (plus any other “include” files referenced in your assembly code) are located in the ADuC root directory (where you clicked the ASM51 icon).
For additional details on the use of the MetaLink ASM51 assembler, please refer to the ASM51 users manual at C:\ADuC\ASM51\ASM51.pdf.
THE ADuC DOWNLOADER:
1. Verify the following link connections on your ADuC812 QuickStart development board:
LK3 - inserted
LK4 - position A inserted (closest to LEDs)
LK6 - position A inserted (closest to LEDs)
For details on link connection options, refer to the eval board user’s guide at
C:\ADuC\Documentation\EvalDocs\812pcb.pdf, or at www.analog.com/microconverter/evaluation_boards.html.
2. Power up your eval board using the provided power supply or a 9V battery (not both).
3. Connect the eval board to your PC’s COM1 serial port using the provided RS-232 cable.
4. Press the RESET button on your eval board.
5.
On your PC, in the ADuC directory, double-click the DownLoad
icon (![]() ).
).
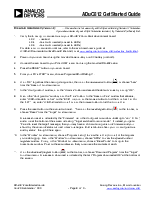
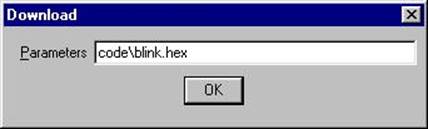
6. In the window that comes up, type the relative path of the hex file you wish to download.
For example, to download the example file C:\ADuC812\code\blink.hex, simply type “code\blink.hex” as shown below.
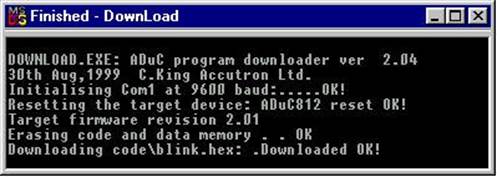
The downloader will display the below information, indicating that the serial download was successful.
7. Remove LK3 from your board and press RESET. The code will begin executing (as indicated by a blinking LED with the example code blink.hex).
8. To perform additional downloads, re-insert LK3 and repeat steps 4 thru 7 above.
ADDITIONAL DOWNLOADER OPTIONS:
To make use of the additional downloader options, type any of the following switches immediately following the file name (making sure to precede each with a space):
/C:n - select the COM port (default is 1)
/F:n.n - select the target crystal frequency in MHz (default is 11.0592)
/R - run the program from the beginning
/R:xxxx - run the program from the specified hex start address
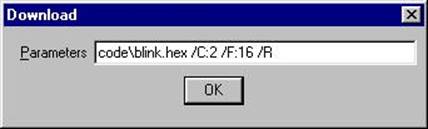
For example, the below text selects a download via COM2 to an ADuC812 running at a 16MHz clock speed and sets the downloader to automatically run the program immediately after downloading.
note: The serial downloader can also be launched directly from a DOS prompt. For example:

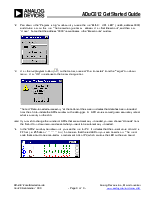
THE ADuC DEBUGGER (Version 2): ….try this version first if you are unsure of your chip’s firmware
Уважаемый посетитель!
Чтобы распечатать файл, скачайте его (в формате Word).
Ссылка на скачивание - внизу страницы.